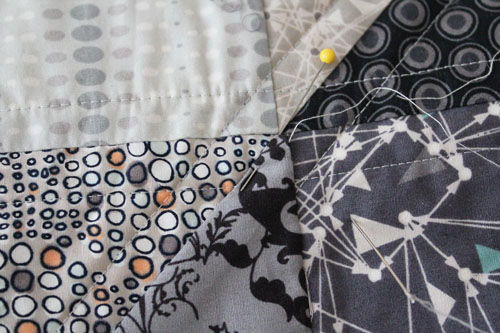
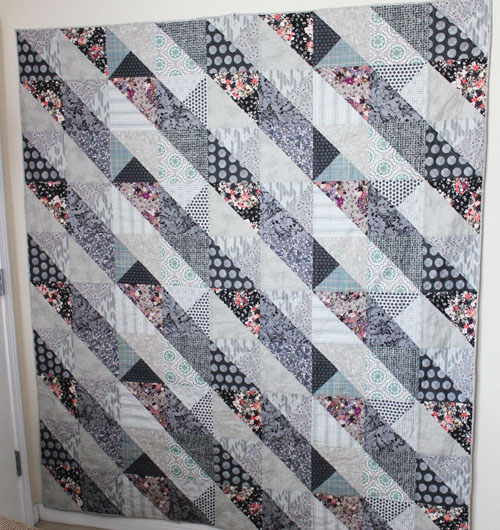
Last spring, I made a quilt for Art Gallery Fabrics to hang in their booth at market. They sent me the fabric, and a computer-generated image of what the quilt should look like. And I went to work cutting, and piecing, and laying out, and more piecing, and quilting… until it was all done. After I had the quilt all put together and quilted, I laid it out on my living room floor only to discover… I’d made a mistake. I had placed the wrong block in one of the spots. And, it wasn’t out on an edge of the quilt where I might be able to pick everything out, replace the block, and then stitch everything back together. It was in the middle.

After painstakingly laying out all the blocks, making sure everything was EXACTLY right, checking, re-checking, and double-checking at every point, I was so frustrated to have a mistake slip through! If the quilt was for my own bed, I might have left it. Things that are handmade are not perfect. That is part of the joy of handmade. The imperfections that show that real human hands put it together.
But this quilt was for the fabric manufacturer, and to hang in their booth at a Fabric Tradeshow. I wasn’t willing to let this big of an imperfection slide. So, I decided to fix the mistake.
All I needed was freezer paper, the correct fabric, a needle and thread, and my iron.
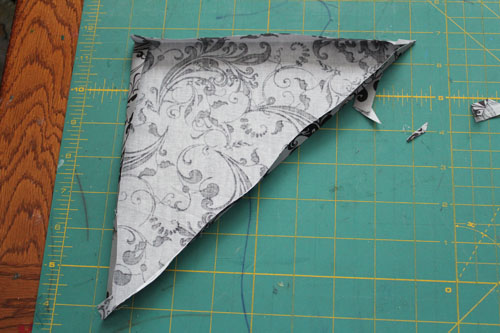
I started by tracing the triangle that was the wrong fabric onto the freezer paper.

I cut it out, then fused it to the back of the correct fabric. I then cut about 1/4″ around the freezer paper, and ironed this in towards the freezer paper to make an applique.
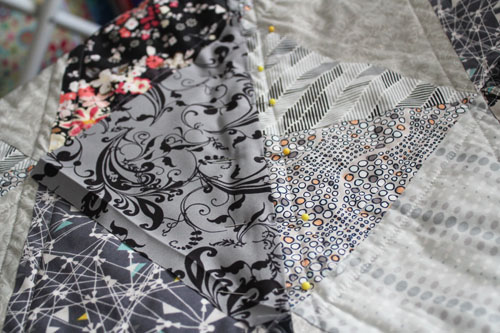
I pinned the patch into place, lining up the edges of the patch with the edges of the fabric underneath.
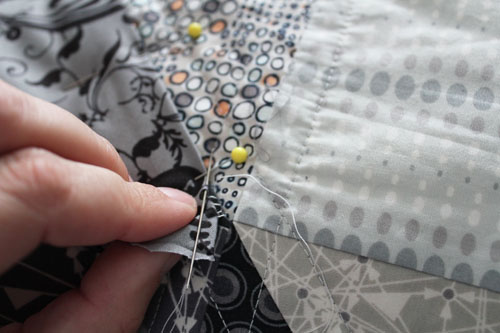
Three quick stitches in place underneath to anchor my thread before beginning…
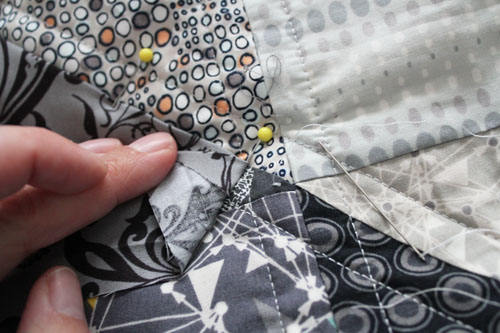
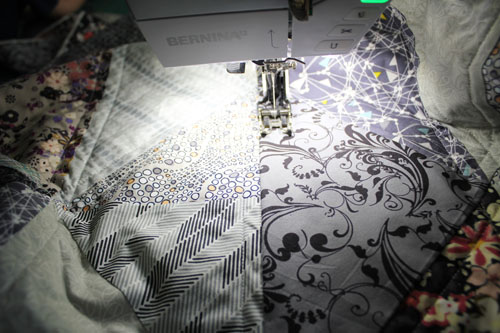
Using an invisible stitch (also called a ladder stitch), I stitched the applique piece over the incorrect fabric.
Once the patch was in place, I needed to quilt it. Luckily, I used a very simple straight-line quilting on this quilt, so I just needed to continue the lines across the patch.
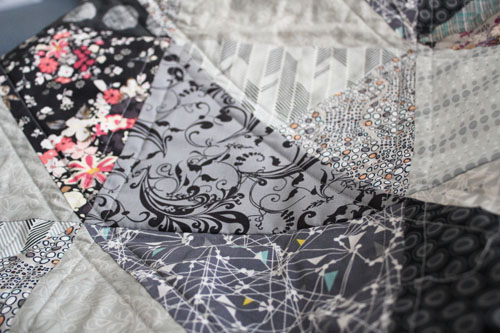
Yay! Quilted in place… you’d never know that there is a different fabric hiding under there…
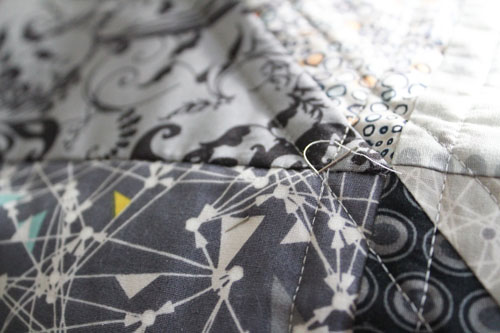
The last step was to bury my quilting threads. With both threads pulled to the top, I tied a double knot, and buried the thread and knot into the batting.
Although I had to hand sew on the patch, it was so much faster than tearing out all my quilting and piecing to reach the patch, replace the fabric, then re-piece and quilt everything. The extra layer of fabric doesn’t add much bulk, and isn’t at all noticeable in the finished quilt. And aren’t these Art Gallery Fabrics stunning? I just love this quilt!

Comments & Reviews
Was the freezer paper used to get a crisp edge? You didn’t say that you took the freezer paper off, but I’m guessing that you did before you sewed it completely down. Am I correct? Thanks for such a clear description of how to do this!
Yes, I peeled the freezer paper away after I folded and pressed the seam allowances. Freezer paper was used to make a template, because while we all hope that our blocks in our finished quilt are “perfect”, after piecing and quilting, they might get pulled slightly out of square. Using the freezer paper creates a perfect template that takes this into account.
i think this quilt design with these fabrics is beautiful and would love to make it. Is there any hope of being able to buy a kit or pattern?
Thanks! I don’t know if Art Gallery Fabrics ever published the pattern or made a kit for this quilt… it was supposed to appear in a magazine, but sadly the magazine folded right before publishing this issue. :/ Maybe contact AGF? It is their “Black Wall Quilt” from 2014 Spring Market.
I made a shirt quilt. Got just about done and left last three pieces with quilter who had the long arm. She attached pieces on bottom instead of side and went ahead and quilted it. Is there any way to take them off and attach to the side of the quilt?
Yikes! Always tough when someone doesn’t see our vision through the way we want to! The first thing I try to do is take a look at their vision… is it okay? Do I like it? Can I live with it? If the answer to all three is NO! then it is time to try for a different solution.
Did your quilter trim up the quilt before giving it to you? If so, it might be far too much work, because you’re going to have to extend the backing and batting when you extend the top. If not, it will be easier. You can unpick the quilting on the blocks she attached to the bottom, remove them, attach them to the side (you might have to pick out some of the quilting on the side to get to the seam allowance), and then re-quilt over the newly attached area. No joke – you’re looking at a lot of work. But, quilts are forever, and maybe that work is worth it to you?
Good luck!
Thanks for your post! I had a wonderful quilter put together my grandmother’s quilt squares from the 1930’s. Her partner made some horrendous squares to make up for two missing squares. I was shocked to see how ugly these two squares were! Two blank muslin squares would have been better -it is the top corner pieces.. I am going to try to do something myself. The quilt is of ladies in hoop skirts with hand embroidered bouquets and the hoops are all from dresses my mom and aunt wore. Thanks for giving me hope. I should just have her redo them, but she has had a stroke and is unable. 🙁 I am not a quilter, but I can sew.
So much of quilting is subjective – the quilter who added those two squares might have really thought she was adding to the quilt! Make sure you add a label to the quilt saying who made the blocks (and when), and who finished the quilt (and when), that will have an impact on the final value of the quilt.
Thank you for this valuable tip!!!!!! I had to replace an 8 inch square in a small wall hanging so googled how to do it-your idea was exactly what I needed. Thank you so much!
I’m so glad I could help!
Caroline, thank you so much for your great tips!
My dilemma is the quilt has been quilted, but now the recipient wants to change the colors of some of the hearts in the blocks. How do you suggest I remake the heart shape and cover over what is there?
Oh! That is a tough one! Generally, I’d say that the recipient of the quilt should appreciate the beautiful gift they were given rather than ask you to make changes to it. But, that is just me…
how to place fabric on back of rag qulit after you already did the top i thought i could do top then add to back after words wasent thinking never made a qulit befor help
I’m sorry, I’m not a rag quilt expert… I have actually never made one! Wish I could be more help…
Carolina, I’m just finishing up a baby quilt with a printed center panel. The panel has a truck on it. I didn’t realize when I ordered it that the windshield had a person/driver in it. I’d like to cover the windshield/driver (it look’s scary to me), but I’m not sure how to do it. Would you suggest doing it the way you described above even with a printed panel?
Thanks so much!
Yes, this method is what I’d use to cover up an undesirable element on a printed panel as well. I think your quilt is going to look fantastic!