 Yup, today’s my birthday. I’m officially 30-something. No more 20’s. Goodbye 30. I’m now 31. And I’m okay with it… surprisingly.
For my birthday, I’ve gotten all kinds of wonderful birthday wishes from my family. Tonight, hubby and I will go out to celebrate. And, I thought I’d make myself a little something for my birthday… a kindle cover for my new kindle!
I’ve been wanting to make one, and this was the perfect opportunity. All the fabrics here are from “Bliss.” I used 4 “Chocolate Bar” pieces for the squares, and 1/3 of a yard of the main fabric.
I started by cutting a 1.5″ strip of the main fabric, and picking out my 4 “Chocolate Bar” pieces. If you don’t have these, you can just cut 2.5×5″ pieces of fabric.

I stitched them onto the strip using a 1/4″ seam.

Then cut the strip the same size as the bar piece. (Please excuse the shadow in the next several photos)

I then stitched the pieces together to make a strip.

I cut the strip lengthwise to make two 2.5″ strips.

I stitched these two strips together, making one very long strip.

To the right side, I added a 2.5″x18″ rectangle, and the the left a 5″x 18″ rectangle.

Using 505 spray, I attached this piece to a layer of batting.

I quilted lines down the 18″ piece, and squares inside my aqua squares, using a walking foot. There is no backing fabric here, just the top fabric and some batting. Notice that the top square isn’t quilted. This one was saved for later…

Then, I cut what will become the lining. For this I needed an 8.5″ by 18″ rectangle. I stitched it to one end, making sure it was the end where the square WAS quilted.

The backing fabric was folded over the seam, leaving a nice little strip of lining showing. This would be a super-cute touch if the lining fabric was a contrasting color.

This shows the top piece folded over, leaving 5.5″ underneath.

I flipped it over, and then folded the lining fabric over, folding it about 1/4″ further than the batting. Leaving about 1/4″ of the batting showing makes for less bulky lining on the finished piece.

Final step before turning – I stitched both sides, and the top… leaving a hole at the top for turning. I then clipped the batting as close to the seam as possible, and left myself some extra fabric at the top to make stitching the opening closed a little easier.

After turning, I had to check to make sure that the kindle fit. Perfectly snug fit – YAY!

Using a needle and thread, I hand-stitched the top closed… and then was off to quilt that last square…
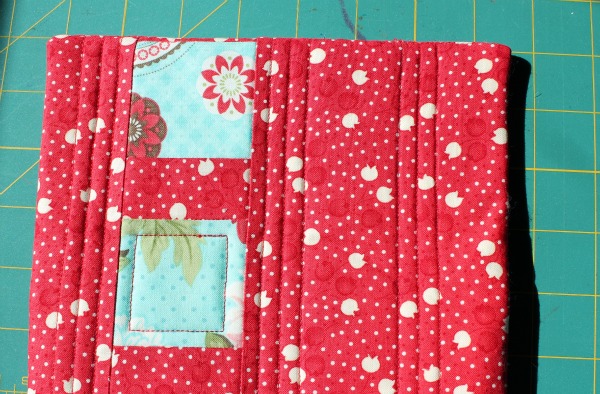
Quilting the last square meant that the inside flap will show the quilting. : )

Now all it needs is a snap, and it is all set!
Always,
C. Moore


Comments & Reviews
That makes me want a Kindle even MORE! Love those colors together. Hope you have a fantastic birthday Carolina!
Waooo..you have a cute blog,& this is a very nice tutorial..keep it up my friend & keep rocking,wish you all the best for the birthday..stay happy
p.s Thanks for the sweet comment..
that turned out great!
red is my favorite and you can’t go wrong with Bliss fabrics!
That came out so cute! Love the little windows.