• Skip to primary navigation
  • Skip to main content
  • Skip to primary sidebar
Home About Subscribe Summer Sew Camp Disclosures

Always Expect Moore

Quilts & Pattern Design

  • Cricut Maker BOTW
  • Quilty5k
  • Gallery Wall QAL
  • Trunk Show
  • Guild Resources
  • Pattern Shop
  • Free Patterns
Home About Subscribe Summer Sew Camp Disclosures
  • Cricut Maker BOTW
  • Quilty5k
  • Gallery Wall QAL
  • Trunk Show
  • Guild Resources
  • Pattern Shop
  • Free Patterns
Home » Blog » Uncategorized » Apron with "Secret" Comfort Ruffles

Apron with "Secret" Comfort Ruffles

Created On: July 11, 2010  |  Updated: July 11, 2010  |   4 Comments

The secret is out – I’m planning a fun week all about Pockets! August 1-7th, right here at ExpectMoore!


Each Sunday before August 1st (starting today), I’ll be presenting a Pocket-related tutorial as part of the Countdown to Pocket Week!

Here is the first in the series… a double-sided Apron with “Secret” Comfort Ruffles!

The ruffles in the ties help the top to stretch, so the apron stays comfortable whether you’re sitting, standing, or constantly getting up and sitting down!

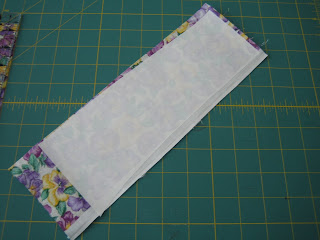
I used 3 coordinating fabrics – a fun flowered print for one side, a simple stripe for the other, and a bright yellow for the pockets and ties. All of them came out of my “stash,” I’m pretty confident that the yellow stripe was passed on to me from my mother:

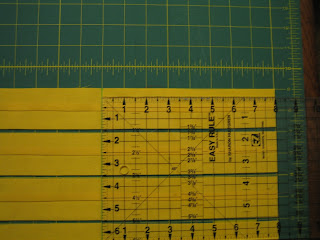
You’ll need to cut 2 pieces of fabric 16.5″ tall by 24″ wide. These are going to be the front and back of the apron. You’ll then cut 4 strips 7″x16″, these will bacome the pockets. Lastly, cut 2 strips 4.5″ wide by 30″ long for the ties (depending on your size, you might be want them shorter or longer than 30″).
I did a flower applique on the front of one pocket, to do this, iron some wonder-under onto the wrong side of a scrap of the flowered fabric, cut around a flower, iron it onto the right side of the pocket (when figuring out where you want to place the flower, keep the seam allowances in mind).

Then do a small zig-zag stitch around the applique with the sewing machine to keep it in place permanently.

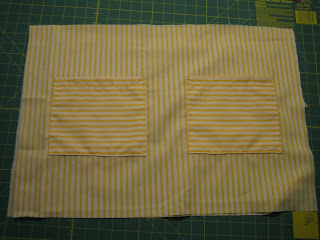
Fold your pieces of pocket fabric in half, so they each become 7″x8″. Sew around the 3 sides with raw edges, leaving a hole to turn them right side out. Turn them, clip the corners, and press. Top stitch along the folded edge to make a nice, finished looking top to your pocket. Place the pockets on ONE layer of fabric, and decide where you want them. Mine are 5″ from the top, and 2.5″ from the sides.

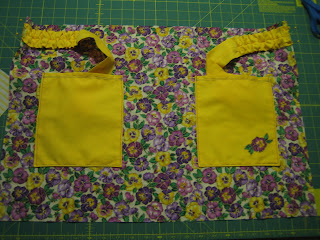
Pin the pockets down, then sew around 3 sides, leaving the top of the pocket open. Side 1 of the apron is done!

Repeat the process with the pockets for the other side. On the flowered side, my pockets are tall, on the striped side, I flipped the pockets to make them wide, rather than tall.

Here is a picture of top-stitching the pockets on. I stitched about 1/8″ from the edge.

Now that the front and back of the apron are done, you start on the ties. Sew your tie pieces into long tubes by folding the fabric right sides together, and stitching along the long side only (leave both short ends open). Turn right side out.

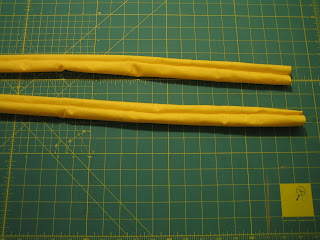
Press your fabric tubes so that they resemble straps. Using a water-erasing marker, draw a line 8″ from the end of ONE side of each tube. This picture shows 4 ties… because I was making 2 aprons (Hint: I only need 1, so the other I’ll be giving away… second hint… during the week of August 1-7… final hint… right here at Expect Moore!).

On your 1″ elastic, measure in 5″ and make a mark with your water-erasing marker.

Using a handy turning tool (or just inching it in if you don’t have one), pull the elastic INTO the tie, until the end of the elastic on the inside is even with the blue line on the outside.

Pull the elastic in a little further, and then pin in place.

Sew the elastic in place. I went back and forth several times, and did a second row of stitching, to make sure the elastic was secure.

Pull the tie over the elastic until the blue line on the elastic is visible. Pin in place. Sew to secure. Trim off the excess elastic.

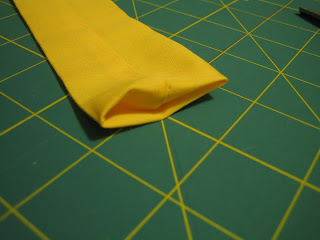
Tuck the raw edges on the non-elastic end of your tie in about 1/2″, and sew down.

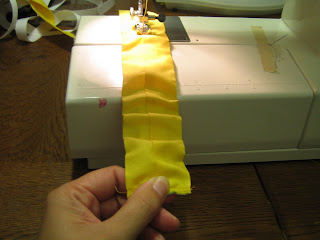
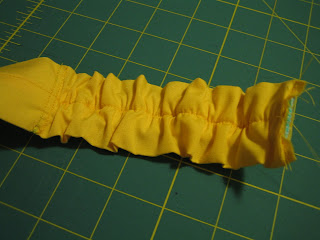
Starting at the non-elastic end, sew down the middle of your tie. When you get to the elastic end, pull the elastic tight so the fabric is as flat as possible as you sew all the way to the end.

You’ll have a pretty ruffle that looks like this:

Repeat the process with the second tie. 
Get out one side of the apron, and lay it flat on your work surface. Pin the ties in place, leaving a little room above each for the seam allowance. If you like, tuck the ties into the pockets to keep them out of the way.

Right sides together, cover this side of the apron with the other side. Make sure the tops of your pockets are pointing “up” towards the straps… upside down pockets will mean more fun for you and your seam ripper. Pin around all 4 edges.

Sew around all four edges, leaving a hole for turning. Clip corners and turn. Top stitch around all four edges.

You’re done! Try on your apron, and fill the pockets with all the things you want close at hand, or that you don’t want little hands to play with.

Stop by next Sunday for another pocket project, as we count down the days to Pocket Week!

If you can’t wait until August for more pocket-related inspiration, check out these great pocket posts from elsewhere on the ‘net.

Pleated Pocket {Made by Rae}
Single Welt Pocket {Fashion Incubator}
DIY Pocket Bib {Prudent Baby}
Zippered Pocket {Creative Cutie}
Recycled Envelope Pocket Books {Whip Up}

Also, I’m still looking for a couple guest bloggers who want to share a pocket project, and a couple more pocket-related giveaway sponsors. If you’re interested, e-mail me at carolina (at) carolinamoore (dot) com.

posted in: Uncategorized

Previous
Turning Tiny Things
Next
Button, Button… match the button!

Reader Interactions

    Leave A Reply! Cancel reply

    Share your thoughts!
    Your email address will not be published. Required fields are marked with *

    This site uses Akismet to reduce spam. Learn how your comment data is processed.

    Comments & Reviews

  1. A Pretty Pastime says

    July 12, 2010

    I found you on One Pretty Thing and I absolutely love your blog! I have now become a follower 🙂

    Did I mention I LOVE pockets?!? I sew pockets in to every piece of clothing I own.

    Katy

    Reply
  2. Cecilia from So Tei-Tei says

    July 15, 2010

    Hi! I found your blog on One Pretty Thing too, I liked your tutorial I’m following you now!

    Reply

Primary Sidebar

Hi, I'm Carolina!

I’m a Quilt Pattern Designer, Award Winning Quilter, and fan of all things quilting. I live in San Diego with my husband, our two boys and our pets. I love keeping both my hands and mind busy, so I’m always working on lots of projects. You’ll find lots of them shared here!

More About Me

Let's Keep In Touch!

I'll let you know about what's new in quilting, freebies you'll want to snag, and brighten your inbox about once a week!

subscribe
90% Faster Than Rotary Cutters

Fat Quarter Shop Quilting Fabrics and Supplies

Instagram Facebook Pinterest YouTube

Recent Posts

  • Flying Pig Quilt Block
  • Bunny and Carrot Quilt Block
  • Free Fancy Drink Quilt Block
  • Dutch Row Houses Quilt Block
  • Quilted Sports Jersey Numbers

Archives

Featured Projects

  • Everything you want to know about Pre Cut Fabrics!
  • Scrappy Placemat - easy to make scrap project
    Scrappy Placemat using Strips and Scrap Tape
  • Sewing Kaleidoscope SVG File
  • Drawstring Backpack
  • Carolina holding fabric marking pens
    Choosing Fabric Marking Pens

Let's Keep In Touch!

Brighten your inbox about once a week!

Always Expect Moore Submark Shop Patterns

Browse

  • Ruler of the Month
  • Quilty5k
  • QuiltMath
  • Cricut Maker BOTW

Shop

  • Digital Download Patterns
  • Quilting Notions
  • Quilt Stickers
  • Quilt Tees

Connect

  • YouTube
  • Instagram
  • Facebook Group
  • TikTok
©2025, Always Expect Moore. All Rights Reserved. About Disclosures
Back To Top
Design by Pixel Me Designs
×

Let's Keep In Touch!

I'll let you know about what's new in quilting, freebies you'll want to snag, and brighten your inbox about once a week!