• Skip to primary navigation
  • Skip to main content
  • Skip to primary sidebar
Home About Subscribe Summer Sew Camp Disclosures

Always Expect Moore

Quilts & Pattern Design

  • Cricut Maker BOTW
  • Quilty5k
  • Gallery Wall QAL
  • Trunk Show
  • Guild Resources
  • Pattern Shop
  • Free Patterns
Home About Subscribe Summer Sew Camp Disclosures
  • Cricut Maker BOTW
  • Quilty5k
  • Gallery Wall QAL
  • Trunk Show
  • Guild Resources
  • Pattern Shop
  • Free Patterns
Home » Blog » Uncategorized » Tell Me… Wall Hanging

Tell Me… Wall Hanging

Created On: August 23, 2011  |  Updated: August 23, 2011  |   3 Comments

I made this wall hanging to hang next to our front door so that every day when we leave the house, we’re reminded in a fun way that we only have one chance to seize each day, and it is up to each of us to enjoy our own wild and beautiful lives.
It was easy to make with the new Martha Stewart Crafts Decorative Paint Line by Plaid that has tons of amazing multi-surface paints, as well as an awesome line of stencils. Though I free-handed much of the lettering, I used the lettering stencils to make the T, W, and P, because I wanted them to stand out.
You can find the stencils, all 160 paint colors (in 5 finishes including the glitter paint that allowed me to fall in love with glitter again), and lots of cool tools exclusively at Michael’s stores in the US and Canada. They’re just starting to appear on shelves now, and are sure to fly off those same shelves because each paint can be used on wood, metal, glass, ceramic, terra-cotta and fabric. It is indoor/outdoor safe, dishwasher-safe on glass and probably the only paint you’ll ever have to buy again!

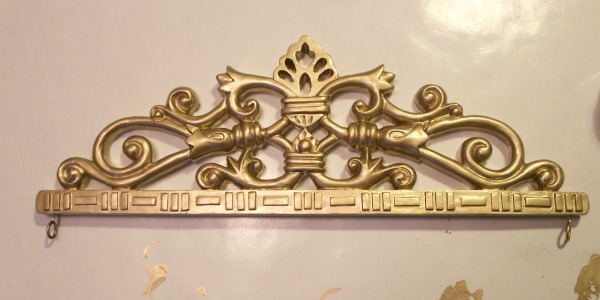
For this project I used some fabric (brown cotton, 3 animal prints, and some decor-weight for the backing), a wall hanging mount, Martha Stewart Crafts Gilding, Martha Stewart Crafts paint in Black Satin, Martha Stewart Crafts Letter Stencil & foam pouncer, and my sewing machine and iron.

I started my project with this old wall-hanging mount that I got from my mom. It was pretty as-is, but I wanted to give it some “oomph.”

So I grabbed the Brass Liquid Gilding that comes with the line. Yes, Martha Stewart and Plaid have pretty much thought of everything. But I’m totally not surprised.
The gilding went on easily. It is so liquid that I had no lumps, bumps, or brush marks showing. It was better than spray-paint, because there were no ugly drips. It went into all the cracks and crevices easily. Really, the gilding was the perfect medium for this project.
I marked some guidelines on my brown fabric, and lined up the stencil. It has these awesome little notches on either side to keep everything straight.
After stenciling each letter with the black paint and pouncer, I filled in the gaps with a small paintbrush to make the letters smooth.
I wrote out the entire quote, “Tell me, what is it you plan to do with your one Wild and Precious life?” and used the stencils on the capital letters. Then I trimmed the quote to fit the mount.
 I cut out squares of my “wild” fabrics.
 Sewed the squares into strips…
Then sewed the strips onto the top and bottom of the quote. I cut some decor-weight fabric for the backing, the same size as the front. I put the right sides together, and stitched all the way around leaving a hole for turning, and a small hole at the two top corners to thread the rod through.
I clipped the corners, and turned the whole thing right side out.
I turned it right-side-out, pressed it, then hung it on the rod and put it up next to the door.

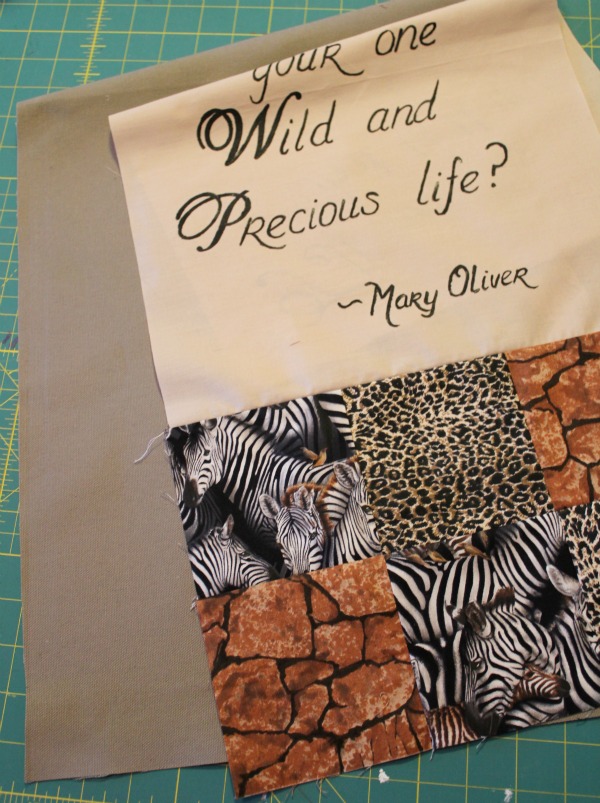
So… “Tell me, what is it you plan to do with your one Wild and Precious life?”

Always,

Full post disclosure here.

posted in: Uncategorized

Previous
Glitter Frame – I’m in love with GLITTER again!
Next
Simple Crackle Birdhouse

Reader Interactions

    Leave A Reply! Cancel reply

    Share your thoughts!
    Your email address will not be published. Required fields are marked with *

    This site uses Akismet to reduce spam. Learn how your comment data is processed.

    Comments & Reviews

  1. flowerofshona says

    August 23, 2011

    That is lovely !!!

    Reply
  2. breanna says

    August 26, 2011

    i love it! great use of animal prints in a non-cheesy way!

    Reply

Primary Sidebar

Hi, I'm Carolina!

I’m a Quilt Pattern Designer, Award Winning Quilter, and fan of all things quilting. I live in San Diego with my husband, our two boys and our pets. I love keeping both my hands and mind busy, so I’m always working on lots of projects. You’ll find lots of them shared here!

More About Me

Let's Keep In Touch!

I'll let you know about what's new in quilting, freebies you'll want to snag, and brighten your inbox about once a week!

subscribe
90% Faster Than Rotary Cutters

Fat Quarter Shop Quilting Fabrics and Supplies

Instagram Facebook Pinterest YouTube

Recent Posts

  • Flying Pig Quilt Block
  • Bunny and Carrot Quilt Block
  • Free Fancy Drink Quilt Block
  • Dutch Row Houses Quilt Block
  • Quilted Sports Jersey Numbers

Archives

Featured Projects

  • Everything you want to know about Pre Cut Fabrics!
  • Scrappy Placemat - easy to make scrap project
    Scrappy Placemat using Strips and Scrap Tape
  • Sewing Kaleidoscope SVG File
  • Drawstring Backpack
  • Carolina holding fabric marking pens
    Choosing Fabric Marking Pens

Let's Keep In Touch!

Brighten your inbox about once a week!

Always Expect Moore Submark Shop Patterns

Browse

  • Ruler of the Month
  • Quilty5k
  • QuiltMath
  • Cricut Maker BOTW

Shop

  • Digital Download Patterns
  • Quilting Notions
  • Quilt Stickers
  • Quilt Tees

Connect

  • YouTube
  • Instagram
  • Facebook Group
  • TikTok
©2025, Always Expect Moore. All Rights Reserved. About Disclosures
Back To Top
Design by Pixel Me Designs
×

Let's Keep In Touch!

I'll let you know about what's new in quilting, freebies you'll want to snag, and brighten your inbox about once a week!