
For years, I’ve been bothered by clipping my corners when making projects. Making bags, pillows, whatever, the instructions call for clipping the corners before turning.
The reason you clip the corners is to reduce bulk. If you don’t trim away the extra seam allowance before turning, you’ll end up with a lot of bulk in the corners, which makes for unattractive corners.
However, when you clip right across the corner, you weaken the seam. After all, part of the job of the seam allowance is to lend support to the seam so that your stitches don’t pull right through the fabric. And cutting away all that seam allowance (leaving just a thread or two to carry the load) has never sat well with me. Especially since the corners of pillows and bags tend to take a beating – so that’s exactly where you would want strength.
I don’t want to start advocating that everyone stop clipping their corners, resulting in a bunch of bulky, unattractive edges. That isn’t a great solution either. So, I’ve come up with a new way to clip corners, I call it “The Seagull Method”. Pretty arrogant, right? Stitchers have been clipping corners the same way for centuries, and here I come along with a new-fangled way to clip. Well, read on, and feel free to tell me in the comments if you think this is stitching genius or sewing blasphemy.
So (or should I say “sew”…), the Seagull Method. Why call it that? Because instead of cutting off triangles, the pieces clipped off the corners look like little seagulls. You know, the little v-shaps seagulls look like when they’re flying way up high? Which is a great way to remember exactly what the method is.
To demonstrate, I stitched a plastic bag to two pieces of fabric, and clipped the corners.
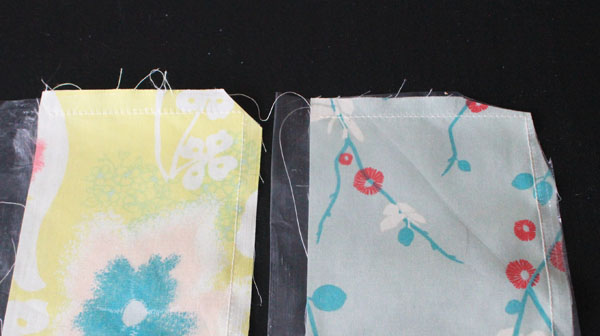
On the left is the traditional way of clipping a corner. At an angle all the way across.
On the right is the Seagull Method. I start about an inch from the corner and taper in, getting about 3-4 threads away from the corner, and then do the same on the other side. Clipping off a little seagull-shaped bit. This takes away more bulk, and spreads the removal over a larger area, keeping as much strength as possible in the seam.
But the real magic comes when the seams are turned.
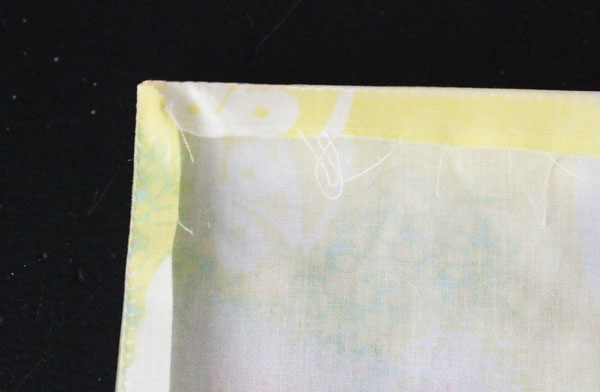
When we turn a traditionally clipped seam, we see this on the inside. The two cut edges but up against each other, and the corner lies flat thanks to the removal of the bulk.
Here is what a corner clipped using the seagull method looks like:
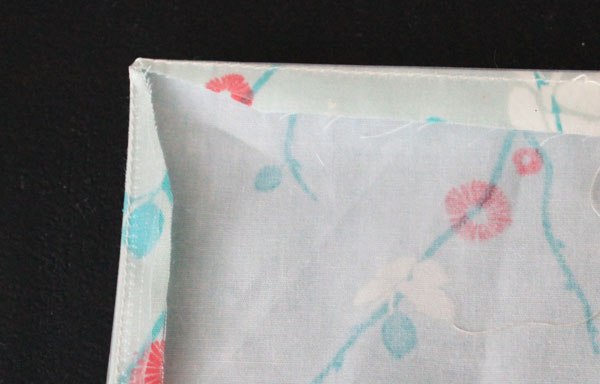
The bulk is removed in the entire corner, making it very easy to insert a corner-turning tool to poke the corner out. There is a small increase in the bulk right in the corner (since we left 3-4 threads instead of only one), but the entire corner has been strengthened.
This corner-trimming method works on all kinds of projects, helping to reduce the bulk without completely weakening the seam. In any case where I don’t plan to top-stitch along the corner, I think the Seagull Method results in a stronger seam. However, if I plan to topstitch along the corner, as you can see from the images, the traditional method leaves more fabric in the corner seam. This additional fabric will help to strengthen the corner when it is topstitched, making traditional clipping better.

What are your thoughts? Will you be clipping corners differently from now on? Or will it at least cross your mind every time you pick up your scissors and get ready to weaken a seam?

Comments & Reviews
Genius! I, too, have always felt the traditional method of clipping a corner put a LOT of strain on the corner stitches. I look forward to trying the “seagull” method in the future. Thanks very much for the tip.
This is a GREAT idea and not sewing heresy by any means. Creative thinking ‘outside of the box’ bring about change. Perfect for the 2014 Word of the Year: Forward.
I’m sending a link to your page to all of my sewing friends.
Many thanks!
Robin, Ox Creek Cottage
I am not getting the point (pun, pun) of the plastic bag in your demo — ? — and yes, this is a very good method of trimming the corners. I have used this method, and prefer it (if I don’t forget and just whack off the corners) but I’ve never heard of it being given a name. “The seagull method” is a great name.
I actually gave it a name because I thought the little clipped corners look like seagulls, and I like names that make sense to me. 😉
The plastic bag was just for demonstration purposes… If I had stitched two pieces of fabric together, when I turned the piece right-sides-out, you wouldn’t get the “inside look” at the seam allowance. By switching out one of the pieces of fabric with a clear piece of plastic, you’re able to peek into the inside of the piece, at how the different clipping methods affect the seam.
Clipping the old way never felt structurally sound to me, either. I love this technique…and, the name is great.