• Skip to primary navigation
  • Skip to main content
  • Skip to primary sidebar
Home About Subscribe Summer Sew Camp Disclosures

Always Expect Moore

Quilts & Pattern Design

  • Cricut Maker BOTW
  • Quilty5k
  • Gallery Wall QAL
  • Trunk Show
  • Guild Resources
  • Pattern Shop
  • Free Patterns
Home About Subscribe Summer Sew Camp Disclosures
  • Cricut Maker BOTW
  • Quilty5k
  • Gallery Wall QAL
  • Trunk Show
  • Guild Resources
  • Pattern Shop
  • Free Patterns
Home » Blog » Uncategorized » Cactus Pincushion – Arrow Cabinets Blog Hop

Cactus Pincushion – Arrow Cabinets Blog Hop

Created On: May 16, 2011  |  Updated: May 16, 2011  |   21 Comments

Hello to everyone stopping by from Crafty Vegas Mom via the Arrow Cabinets Pincushion Blog Hop!

A couple weeks ago, I read about the Arrow Cabinets “No More Tomatoes” Pincushion contest. (UPDATED: This pincushion WON the contest! WOOT!) I’ve really been loving contests lately! Probably because creativity + deadline = a project that actually gets finished! And I have several unfinished projects lying around here… but that is a post for another day!

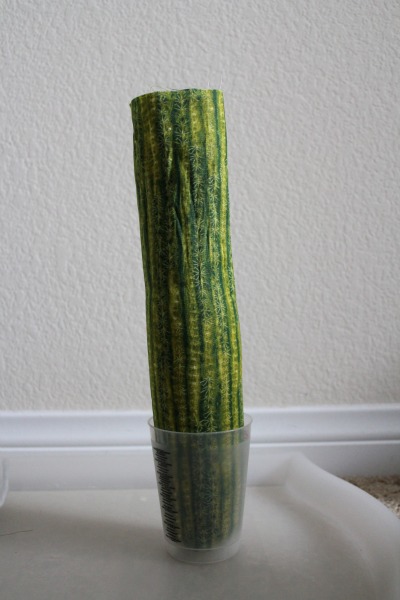
The contest had just one rule – no traditional pincushions. So, I came up with this fella here, and I’m GIVING HIM AWAY! (UPDATED: Giveaway closed, but the tutorial below will stay up)

That’s right, follow this blog, and leave a comment on this post, and one lucky reader will get this pincushion in the mail! US residents only. Winner will be picked on Friday 5/20/11. (Updated: Giveaway now closed)

If you’d like to continue on the blog hop, go check out this adorable cherry cupcake at Pink Marigold. or you can keep reading here to for my tutorial on how you can make your own cactus pin cushion!

To make your own cactus pincushion, you’ll need:
Chosen fabric
2.5″ clay pot
Fusible Fleece
Batting scraps
Needle & coordinating thread
pins
Crushed Walnut shells (available at most pet food stores)

You can use any fabric you like, of course, but I found this great Michael Miller Cactus Stripe:
Use Fusible Fleece (the bumpy side is the fusible side), and iron it on to the wrong side of the fabric.
Cut into 3 pieces, each 8.5×14″ (the stripe should run the length of the 14″). Don’t worry if your fusible fleece doesn’t make it quite to the edges of the fabric.
Fold in half, and stitch down the 14″ side, to make a tube. I used a 5/8″ seam allowance.
Using a double strand of thread…
Make a large gathering stitch around one end, about 3/4″ from the top, all the way around so that the end of your stitching matches up with the beginning.
Pull tight and tie… carefully. You don’t want your thread to break!
Stitch near the top several times in a * shape, giving the end extra strength and security.
Then turn the piece right side out. Repeat these steps with the other two pieces.
Tear up your batting scraps into small pieces.
Put one of the pieces, sewn end down, into a cup.
Stuff the batting pieces down to the bottom, covering the end. This is so that none of the crushed walnut shells accidentally slip through any small holes at the top.
Pour in the crushed walnut shells. These are awesome for pin cushions. A 5qt bag costs less than $5. Find it in the reptile section of the pet store.
Fill about 1/2 way up…
Then twist the top, and swing it around, forcing all the shell bits to compact at the end. 
You’ll end up doing this several times, but you want to have those walnut shells REALLY compacted in there so that your cactus will stand up straight.
Once it is well compacted, and full to about 2″ from the top, sit down, and put the cactus between your legs so that it won’t tip over during this next step.
Fold the top down…
Then fold the other side down. You want to make sure that you’re keeping the fabric nice and tight.
Then stitch the opening closed. You’ve finished the main body of the cactus! Try fitting it into your clay pot to make sure it fits okay. If it is too high up, you can always put pennies in the base to balance it so it won’t tip over.
 For the arms, follow the previous steps, filling the pieces only partway with walnut shells (3″ for the short arm, 4.5″ for the long arm). Once you have the shells compacted in there, cover the end with some more batting so that the walnut shells don’t pour all over the place as you’re making the shape. Start pulling the fabric up on one side, making a crease.
Keep creeping the fabric up… this is kind-of tricky, but it is similar to hiking up nylon stockings when they’ve fallen… you’re just doing the same thing on one side of the cactus.
Once you’ve achieved an angle you like, pin the sides and use tiny stitches to secure.
Cut off the top, and fold in the sides, filling the hollow up with batting. You’ll want this part between the bend and the end to be only 1-2″.
Choose where you’d like the arm on the cactus to go, then pin all the way around, securing the arm in place. Step back to make sure you like the placement, then stitch all the way around using tiny stitches. You may want to stop every inch or two to add several stitches in place, just in case the thread breaks at some point in the future.
Now you’re all done, and you can photograph your cactus in its “Natural Habitat!”
I actually went to the Ethel M. Chocolate Factory Botanical Garden to take my pictures. It is only a few minutes away from where I work, and although I felt a little silly carrying around a cactus… I had a lot of fun!
Plus, there was chocolate! : )
Remember to follow this blog and leave a comment to be entered to WIN this pincushion (sorry – US residents only)! (Updated: giveaway closed).
Then go satisfy your sweet tooth with Pink Marigold’s Cherry Cupcake, then go on to check out all the other “Non-tomato” pincushions!

Always,
Carolina

posted in: Uncategorized

Previous
How I Spent my Blogiversary
Next
I’m going to be a Tante {Again!}

Reader Interactions

    Leave A Reply! Cancel reply

    Share your thoughts!
    Your email address will not be published. Required fields are marked with *

    This site uses Akismet to reduce spam. Learn how your comment data is processed.

    Comments & Reviews

  1. jan says

    May 16, 2011

    Very cute idea! I am intrigued by the walnut shells…

    Reply
  2. Staci says

    May 16, 2011

    Carolina, I think this might be my favorite thing you’ve made yet!

    Reply
  3. Anonymous says

    May 16, 2011

    This is so darn cute! I love it! Thanks for the info on where to get the walnut shells, those are great for pin cushions.
    SharonA

    Reply
  4. Chris Wooten says

    May 16, 2011

    cute pin cushion idea..

    Chris
    mcwooten1999@carolina.rr.com

    Please visit my blog if you get a chance. I did not post today because we have a job going on at our house…storm damage from last week clean up

    http://turnedgypsy.blogspot.com

    but when I start posting again…I will have giveaways..

    Reply
  5. CupcakeCatie says

    May 16, 2011

    I just love your pin cushion, so cute! 🙂
    I follow your blog, thanks to Arrow Cabinets!

    cllovegood@yahoo.com

    Reply
  6. MaryW-Kansas says

    May 16, 2011

    Such a unique idea! I’m glad you posted the directions so I can make one myself!!

    Reply
  7. KB VanHorn says

    May 16, 2011

    Awesome idea! I’m sure it’ll look great with needles sticking out too.

    Reply
  8. HongKongChick says

    May 16, 2011

    soo darn cute love love love it.

    Reply
  9. Annette says

    May 16, 2011

    This is so cute and unique! Great tip for the walnut shells too!

    Reply
  10. Cyndi S says

    May 16, 2011

    What a creative pin cushion. I love it.
    cstephenson at q dot com

    Reply
  11. kluless says

    May 16, 2011

    VERY nicely done tutorial and thanks for the tip on the crushed walnut shells. I have heard they are excellent for pincushions but had to clue where to purchase them.

    Reply
  12. posh girl friday says

    May 17, 2011

    Adorable pin cushion! Thanks for the walnut shell info! 🙂

    Reply
  13. Bobbi says

    May 17, 2011

    what a fabulous pin cushion!!! living in the desert like you i appreciate the cactus! LOVE IT

    Reply
  14. chastity says

    May 17, 2011

    HAHA I thought you used a real cactus…until I realized you actually made it…GREAT JOB! I love this!

    Reply
  15. Becky says

    May 17, 2011

    That is so smart! I wondered how you got it to stand.

    Reply
  16. Anonymous says

    May 18, 2011

    cute pin cushion!

    Karla Schroeder

    Reply
  17. MulticrafterAmy says

    May 19, 2011

    What a great pin cushion. So creative. Looked real in the pic.

    Reply
  18. ~Kathleen says

    May 20, 2011

    Wonderful idea and execution! So very creative! I applaud you!

    Reply
  19. Tami says

    May 23, 2011

    I was wondering where you’d found all the great cacti. What a great place to do a photo shoot!

    Reply
  20. Honey says

    August 4, 2011

    Guess what we’re making when we study desert biomes! This would be perfect to use. Btw…its cute really cute!
    Honey
    @Mondorfment

    Reply
  21. Anonymous says

    December 29, 2011

    Creativity is such a gift! Thank you for sharing.

    Marny CA

    Reply

Primary Sidebar

Hi, I'm Carolina!

I’m a Quilt Pattern Designer, Award Winning Quilter, and fan of all things quilting. I live in San Diego with my husband, our two boys and our pets. I love keeping both my hands and mind busy, so I’m always working on lots of projects. You’ll find lots of them shared here!

More About Me

Let's Keep In Touch!

I'll let you know about what's new in quilting, freebies you'll want to snag, and brighten your inbox about once a week!

subscribe
90% Faster Than Rotary Cutters

Fat Quarter Shop Quilting Fabrics and Supplies

Instagram Facebook Pinterest YouTube

Recent Posts

  • Flying Pig Quilt Block
  • Bunny and Carrot Quilt Block
  • Free Fancy Drink Quilt Block
  • Dutch Row Houses Quilt Block
  • Quilted Sports Jersey Numbers

Archives

Featured Projects

  • Everything you want to know about Pre Cut Fabrics!
  • Scrappy Placemat - easy to make scrap project
    Scrappy Placemat using Strips and Scrap Tape
  • Sewing Kaleidoscope SVG File
  • Drawstring Backpack
  • Carolina holding fabric marking pens
    Choosing Fabric Marking Pens

Let's Keep In Touch!

Brighten your inbox about once a week!

Always Expect Moore Submark Shop Patterns

Browse

  • Ruler of the Month
  • Quilty5k
  • QuiltMath
  • Cricut Maker BOTW

Shop

  • Digital Download Patterns
  • Quilting Notions
  • Quilt Stickers
  • Quilt Tees

Connect

  • YouTube
  • Instagram
  • Facebook Group
  • TikTok
©2025, Always Expect Moore. All Rights Reserved. About Disclosures
Back To Top
Design by Pixel Me Designs
×

Let's Keep In Touch!

I'll let you know about what's new in quilting, freebies you'll want to snag, and brighten your inbox about once a week!