• Skip to primary navigation
  • Skip to main content
  • Skip to primary sidebar
Home About Subscribe Summer Sew Camp Disclosures

Always Expect Moore

Quilts & Pattern Design

  • Cricut Maker BOTW
  • Quilty5k
  • Gallery Wall QAL
  • Trunk Show
  • Guild Resources
  • Pattern Shop
  • Free Patterns
Home About Subscribe Summer Sew Camp Disclosures
  • Cricut Maker BOTW
  • Quilty5k
  • Gallery Wall QAL
  • Trunk Show
  • Guild Resources
  • Pattern Shop
  • Free Patterns
Home » Blog » Uncategorized » Craft a Checkerboard

Craft a Checkerboard

Created On: March 19, 2013  |  Updated: March 19, 2013  |   5 Comments

My oldest son loves playing games. We’ve introduced him to Chutes and Ladders, Candy Land, Memory, and even play a very basic version of Parcheesi with him. He’s been asking to play checkers, so I thought it would be fun to teach him on a special checkerboard!

Making a checkerboard turned out to be much easier than I thought it would be! Here is what I used:
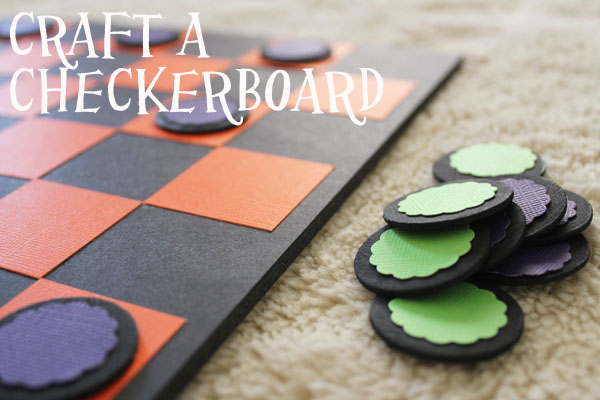
Black Foamcore (a piece at least 13.5″ by 13.5″)
Core’dinations Cardstock in orange, purple, and green
1 1/4″ wooden disks (you need 24, but make extras just in case some get lost)
Black paint
1″ scallop punch
Glue Dots
Paper Cutter
Ruler
Pencil
Craft Knife
Glue Stick

I started by making my Checkerboard pieces, I painted the disks on all sides, punched scallops from my green and purple Core’dinations cardstock, and attached the scallops to the disks. Half the disks got purple scallops, half got green.

Since my wooden disks were 1 1/4″ in diameter, I wanted the squares on my board to be 1 1/2″. I drew lines on my foamcore to mark the layout – each line is 1 1/2 inches from the one next to it on all sides. I cut 32 squares out of the orange cardstock – each 1 1/2″ square.

I used a glue stick to secure the squares. I love using the Core’dinations cardstock for projects like this where the sides of the paper are visible, especially against a dark background. With other scrapbook papers, you see the white edge where the paper was cut. These Core’dinations papers have color all the way through, so there is no ugly white line! Yay!

Once all my squares were secure, and after I had erased any stray pencil marks, I trimmed my foamcore, giving my checkerboard a 1/4″ border.

I waited to do this last for two reasons. The first was just in case I mis-measured or my squares didn’t line up perfectly, trimming it last ensured that all my borders would still be the same size. The second was to protect the edges. If I dropped or banged the board while making it, I’d still have beautiful, crisp edges on my finished project!

Now the board is all set up and ready to play!

posted in: Uncategorized

Previous
5 Tips for Painting with Kids
Next
Make a T-Shirt Quilt (Part 2 of 3) VIDEO

Reader Interactions

    Leave A Reply! Cancel reply

    Share your thoughts!
    Your email address will not be published. Required fields are marked with *

    This site uses Akismet to reduce spam. Learn how your comment data is processed.

    Comments & Reviews

  1. Camille says

    March 23, 2013

    Yea! Another use for my scallop punch. This would be so cute using opposing school colors! 🙂

    Reply
  2. Brandie @ Home Cooking Memories says

    March 23, 2013

    FUN, FUN!! Pinned it.

    Reply
  3. The Joys of Boys says

    March 23, 2013

    This is so cute! My boys would love it!

    Reply
  4. Angie Holden says

    March 23, 2013

    I love this idea! 🙂 Thanks for the great tutorial!

    Reply
  5. Shirley says

    April 23, 2014

    What do you do when you king someone? Just asking! I love this idea and I think I will try to make this.

    Reply

Primary Sidebar

Hi, I'm Carolina!

I’m a Quilt Pattern Designer, Award Winning Quilter, and fan of all things quilting. I live in San Diego with my husband, our two boys and our pets. I love keeping both my hands and mind busy, so I’m always working on lots of projects. You’ll find lots of them shared here!

More About Me

Let's Keep In Touch!

I'll let you know about what's new in quilting, freebies you'll want to snag, and brighten your inbox about once a week!

subscribe
90% Faster Than Rotary Cutters

Fat Quarter Shop Quilting Fabrics and Supplies

Instagram Facebook Pinterest YouTube

Recent Posts

  • Flying Pig Quilt Block
  • Bunny and Carrot Quilt Block
  • Free Fancy Drink Quilt Block
  • Dutch Row Houses Quilt Block
  • Quilted Sports Jersey Numbers

Archives

Featured Projects

  • Everything you want to know about Pre Cut Fabrics!
  • Scrappy Placemat - easy to make scrap project
    Scrappy Placemat using Strips and Scrap Tape
  • Sewing Kaleidoscope SVG File
  • Drawstring Backpack
  • Carolina holding fabric marking pens
    Choosing Fabric Marking Pens

Let's Keep In Touch!

Brighten your inbox about once a week!

Always Expect Moore Submark Shop Patterns

Browse

  • Ruler of the Month
  • Quilty5k
  • QuiltMath
  • Cricut Maker BOTW

Shop

  • Digital Download Patterns
  • Quilting Notions
  • Quilt Stickers
  • Quilt Tees

Connect

  • YouTube
  • Instagram
  • Facebook Group
  • TikTok
©2025, Always Expect Moore. All Rights Reserved. About Disclosures
Back To Top
Design by Pixel Me Designs
×

Let's Keep In Touch!

I'll let you know about what's new in quilting, freebies you'll want to snag, and brighten your inbox about once a week!