• Skip to primary navigation
  • Skip to main content
  • Skip to primary sidebar
Home About Subscribe Summer Sew Camp Disclosures

Always Expect Moore

Quilts & Pattern Design

  • Cricut Maker BOTW
  • Quilty5k
  • Gallery Wall QAL
  • Trunk Show
  • Guild Resources
  • Pattern Shop
  • Free Patterns
Home About Subscribe Summer Sew Camp Disclosures
  • Cricut Maker BOTW
  • Quilty5k
  • Gallery Wall QAL
  • Trunk Show
  • Guild Resources
  • Pattern Shop
  • Free Patterns
Home » Blog » Uncategorized » Drawstring Backpack Tutorial

Drawstring Backpack Tutorial

Created On: May 31, 2011  |  Updated: May 31, 2011  |   7 Comments

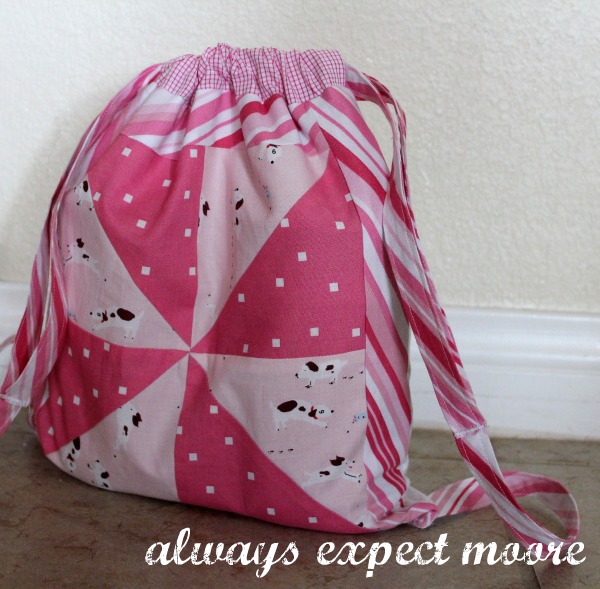
We had a birthday party to go to this weekend, for a little girl turning 6. Although running to the store and grabbing something is much easier, I thought it would be fun to whip up a cute gift. I decided on this fun little drawstring backpack, and made a tutorial to go along with it.

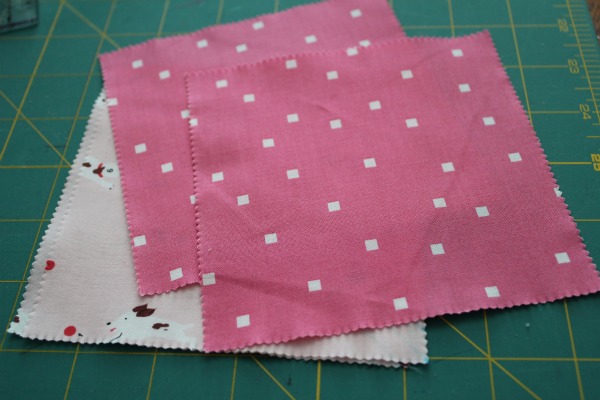
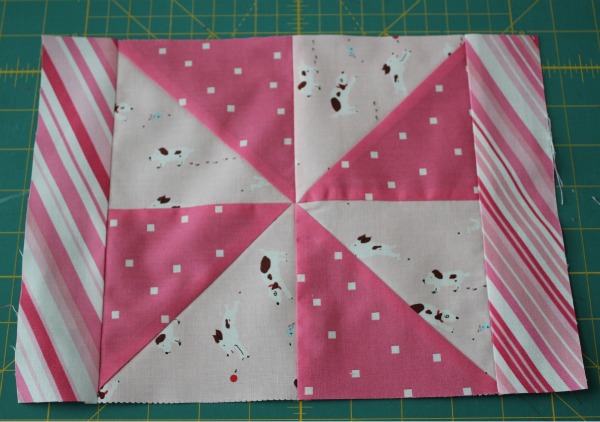
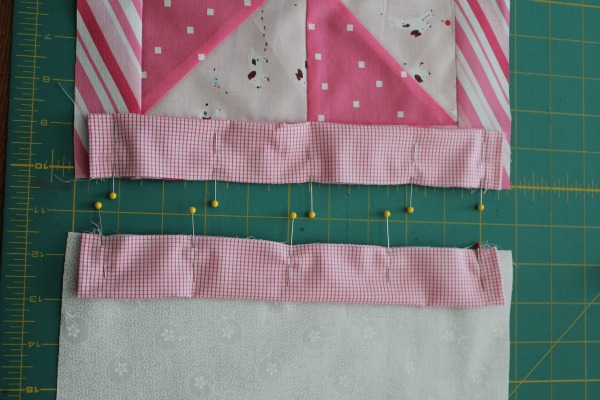
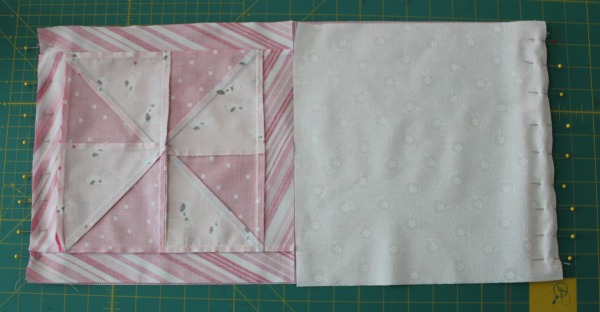
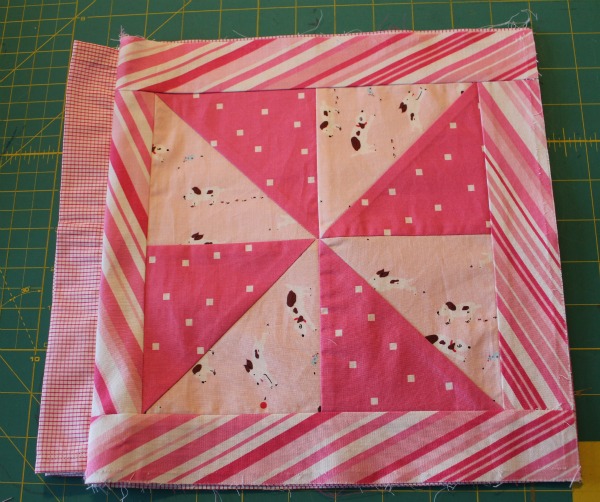
The block in the center is made with Sherbet Pips, I bought 2 charm packs a couple months back, and the rest of the fabric are just fat quarters I had in my stash.

Inside the backpack are 2 containers of custom-made play doh, with a label… scroll down to the end of the tutorial to check it out.

What you’ll need:
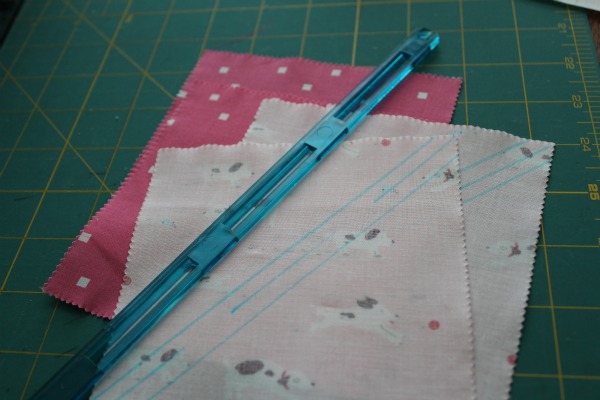
4 charm squares or 5″ squares (2 of each design)
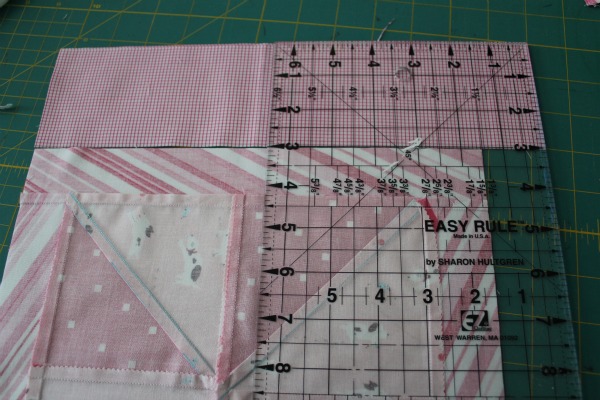
1 Fat Quarter for the border and straps (I used a stripe)
1 fat quarter for the lining and top (I used a pink check)
1 fat quarter for the back (I used white)
General sewing supplies – scissors, sewing machine, rotary cutter, thread, etc.

Start by picking your 4 charm squares

Use a ruler to mark down the middle of two of the charm squares, diagonally. Stack one light and one dark square RST (Right Sides Together), then stitch 1/4″ on either side of the line. I used this nifty ruler that gives me my center line and my 1/4″ lines easy-peasy.
 
 Once you’ve stitched on either side, cut down the middle, and you’ll have 4 HSTs (Half Square Triangles).
 
 Press them open, and arrange into a pinwheel pattern. Stitch together.
 Cut 5 2″ strips out of the border/strap fabric.
Cut one in half, and stitch on either side of the pinwheel bock. Use 2 other strips, stitching one to the top, and one to the bottom. Reserve the extra for the straps.
Cut the lining piece based on the size of the block. The lining will be one piece the height of the block, but twice as long. In the picture you can see that the lining is folded in half, so it is exactly the size of the block. I trimmed 1/4″ from all sides of my block to make it fit the fat quarter.
Cut the backing piece the same size as the front piece.
 
 Cut 2 3″ wide pieces of the top/lining fabric for the casing that the drawstring will go through.
Cut the casing 1.5″ longer than your block.
 Fold the small end of the casing over 1/2″, repeat, and stitch down. I did a double-layer of stitching. Repeat on both sides of the casing. Repeat for the second casing piece.
 Grab the 2 extra striped fabric pieces. Attach the extra length from the border of the block, one to each. Fold in half the long way (RST) and stitch down. It will look like the picture. Turn right side out (carefully), then top stitch down each side for strength.
 Fold the casing in half, and pin to the top of both the front and back pieces.
Lay these pieces down on top of the backing, add some more pins, and stitch down.
 
Now layer the bag exactly as it will look when it is finished, top, two middle pieces, and bottom, all with the correct sides facing the correct way.
 This step is very important! Turn JUST the top piece over, so now the top piece is on the bottom, with the right side facing up, then the back with the right side down, then the lining, with the right sides facing each other.
  Pin all the way around, and stitch the sides and bottom, leaving a hole at the bottom for turning.
 Turn right-side out through the hole you left. Everything should come out correctly if you followed the very important step. 
Thread one drawstring all the way around and pin to itself at the top. Pin the loose end at the bottom so that it forms the strap to the backpack. Stitch together at both of the pinned places. I used a small, tight zig-zag for durability.
Repeat with the other side and you have the start to a great gift! Come back tomorrow and I’ll have the printable for the custom-doh labels!

Always,

Pin It

Shared in blogland at:

posted in: Uncategorized

Previous
Giveaway day winner!
Next
Custom Doh Printable

Reader Interactions

    Leave A Reply! Cancel reply

    Share your thoughts!
    Your email address will not be published. Required fields are marked with *

    This site uses Akismet to reduce spam. Learn how your comment data is processed.

    Comments & Reviews

  1. Jeannie says

    June 1, 2011

    This is so cute and love the use of a block for it as well! Just super cute!!!

    Reply
  2. Marny says

    December 29, 2011

    Have you thought about a design (simple, if possible) for a duffel bag?

    I knit for charity and kids who go to foster homes need something in which to carry their worldly possessions.

    Or perhaps you have suggestions, which would be most appreciated.

    Thank you for sharing so much of yourself.

    Hugs galore,
    Marny CA

    Reply
  3. The Belly Dancer says

    January 2, 2012

    I love it. I want to sew a backpack, yours is great inspiration.

    Reply
  4. Debbie says

    November 1, 2012

    I found a pooh and piglet jacket at Goodwill. I was going to make a back pack for her seeing as hers is wearing out. Thanks for the directions.

    Reply
  5. Randhi says

    February 12, 2014

    I used to have one of these when I was small and used to carry it around everywhere I go 🙂

    Reply

Primary Sidebar

Hi, I'm Carolina!

I’m a Quilt Pattern Designer, Award Winning Quilter, and fan of all things quilting. I live in San Diego with my husband, our two boys and our pets. I love keeping both my hands and mind busy, so I’m always working on lots of projects. You’ll find lots of them shared here!

More About Me

Let's Keep In Touch!

I'll let you know about what's new in quilting, freebies you'll want to snag, and brighten your inbox about once a week!

subscribe
90% Faster Than Rotary Cutters

Fat Quarter Shop Quilting Fabrics and Supplies

Instagram Facebook Pinterest YouTube

Recent Posts

  • Flying Pig Quilt Block
  • Bunny and Carrot Quilt Block
  • Free Fancy Drink Quilt Block
  • Dutch Row Houses Quilt Block
  • Quilted Sports Jersey Numbers

Archives

Featured Projects

  • Everything you want to know about Pre Cut Fabrics!
  • Scrappy Placemat - easy to make scrap project
    Scrappy Placemat using Strips and Scrap Tape
  • Sewing Kaleidoscope SVG File
  • Drawstring Backpack
  • Carolina holding fabric marking pens
    Choosing Fabric Marking Pens

Let's Keep In Touch!

Brighten your inbox about once a week!

Always Expect Moore Submark Shop Patterns

Browse

  • Ruler of the Month
  • Quilty5k
  • QuiltMath
  • Cricut Maker BOTW

Shop

  • Digital Download Patterns
  • Quilting Notions
  • Quilt Stickers
  • Quilt Tees

Connect

  • YouTube
  • Instagram
  • Facebook Group
  • TikTok
©2025, Always Expect Moore. All Rights Reserved. About Disclosures
Back To Top
Design by Pixel Me Designs
×

Let's Keep In Touch!

I'll let you know about what's new in quilting, freebies you'll want to snag, and brighten your inbox about once a week!