
I was invited to take part in a challenge. And I couldn’t resist. I really, really love challenges! This challenge was put together by the lovely folks over at Scribble Shop. It is an online crafting wonderland with thousands of supplies for all kinds of crafts. This could be really dangerous – in the past my crafting has been curbed because I won’t leave the house in my PJs… but Scribble Shop has just about anything I could want only a click away!
The challenge was to take a box of mystery supplies and use all of them in a fun DIY project. I was allowed to add other materials from my stash as needed. When you see the materials that Scribble Shop sent, you’ll think they did some serious homework in deciding what to send me!
I love working in fabric, so of course there were some charm squares (5″ squares of fabric) in my box. However, I hate glitter… and incorporating it in any project is always a big challenge for me… so, to challenge me, of course there were not one but TWO glitter items in the box – both glitter brads and actual (shudder) loose glitter! Feathers, chalkboard paint, and wool roving rounded out the items in the box. Wool roving!? I had no idea that such a product existed before taking part in this challenge!
But, working with supplies I’ve never heard of, or wouldn’t regularly use, is what makes a great challenge! After all, if they’d just sent me a box of the same stuff I already use every day, there wouldn’t be much “challenge” now would there?
What is interesting is not every blogger who participated in the challenge got the same box. You can go see all the other projects on The Blueprint Social Scribble Shop Pinterest Page. Some got craft sticks (over-sized popsicle sticks), felt stickers, raffia, stencils, decorative glass… Scribble Shop really had fun putting together some challenging boxes of crafty goodness!
 |
| Scribble Shop Challenge Supplies |
Well, once I’d put my craft-challenge hat on, I had to come up with a project. Something fun. Something crafty. I thought of a recent visit with my fun and crazy friend Christy, where we scoured a store looking for fun props to take pictures with. She’s the kind of gal I’d love to spend an afternoon goofing off in front of a camera with. In fact, we’ve got lots of photos to prove that we love doing exactly that! But props just make it so much more fun. So I set out to make some fun and goofy props perfect for photobooth madness!

Of course, I had to make a couple funky headbands. The first uses two balls made from the wool roving. Because this process was new to me, but super fun, I put together this easy tutorial on how to felt beads from wool roving.
For my headband, I made two extra-large wool balls.
I let these dry for 2 days, to make sure all the water dried completely. This is important because if I used them while wet, they would be super-super heavy, and weigh down the entire headband.
I used a headband and two pipecleaners from my stash.
Each pipecleaner was folded in half, and twisted to attach to the headband. You may want to add a dab of glue to secure, but I didn’t really need to.
Since I’d made the large balls as beads, with a hole down the middle, all I had to do was push the double-layer pipecleaner through the hole.
This sounds easier than it was, because the hole in the felt bead was pretty small. So, I actually twisted the pipecleaner ends together, and twisted the bead on, as if it were threaded. Worked like a charm!

Next up was the chalkboard shades. This was super fun! I’ve had these scratched-up Jackie O. sunglasses forever, but didn’t want to throw them away. Even back when I wore them, I used them as a headband more than as sunglasses, so the scratches didn’t bother me too much. But, they were crying out to be loved again!
Following the directions on the chalkboard paint bottle, I shook well, and applied two coats of chalkboard paint to the lenses of the sunglasses – one coat in each direction.
I did have a little “overpaint” but it was easy to scratch it off the sunglasses frames with my fingernail.
Then, to incorporate the glitter, I added a little embellishment on the frames.
The glitter came with glue, which I just dabbed on in circles.
I sprinkled on the glitter, and had “jeweled” sunglass frames!
After the glue was dry, I used a dry paintbrush to whisk away the extra contaminant… er… glitter.
I wrote on the sunglasses using regular chalk sticks. A little tip from my waitressing days of filling out the “specials” board… when using chalk, if you dip the tip of the chalk in water, you get a much darker and well-pronounced chalk line! Just keep dipping and drawing. The original line might look a little lighter, but as the chalk line dries, it gets nice and dark!
 Feathers are a natural fit for making Photo Booth props. So much fun and color! I decided to use the feathers in two different ways. I grabbed some feathers to make a headband, which allowed me to use one of the glitter brads, too!
Using a plain headband from my stash, I added a line of hot glue, and (very carefully!) attached a feather.
I put another line of glue down that feather, and added another feather.
I kept adding lines of glue, and tacking down feathers in different directions.
When I felt like there were enough feathers, it was time to add the glitter brad.
I tucked back the “pokey” parts of the brad, and just glued it right to the bottom of the last feather!
Since I had lots of feathers left over, I used the same technique to add a bunch of feathers to a clothespin. For Photo Booths, this is simple to clip on a shirt, a necklace, or even clip into hair!
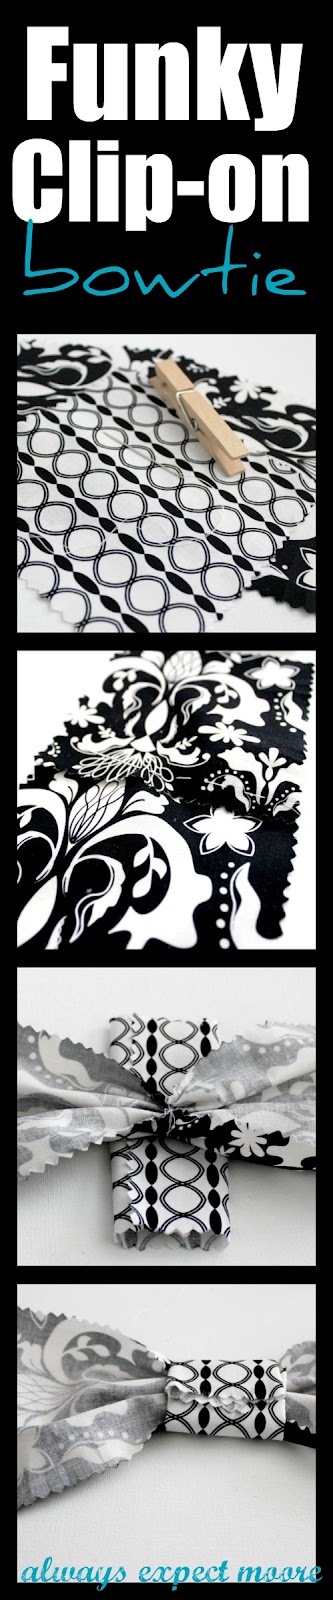
Nothing says “crazy prop” like a giant bowtie! The precut fabric squares made putting the bowtie together a snap! Because the edges of the squares are cut in a zig-zag (or “pinked” edges), I don’t have to worry about the fabric fraying!
I grabbed two coordinating squares, and one contrasting square for the middle.
I overlapped the edges of the two coordinating squares slightly.
Using a needle and thread, I did a simple running stitch through the two layers of fabric, going from one side to the other. No need to be fancy, these stitches will be completely hidden later. I then tied the two ends of the thread together in a knot on the back, and clipped the threads.
I folded the contrasting square into thirds, with the raw edge tucked to the back, and put the bow on top.
Using a hot glue gun, I glued down one side of the contrasting piece, then the other, to make the center of the bowtie. Then I just glued a clothespin to the back.
The clothespin isn’t an obvious choice, but makes the clip easier to use and more versatile than a safety pin. It can be clipped to a shirt, a necklace – anywhere really! And is super quick to take on and off.
There you have it – 5 great photobooth props that are simple to make! Any other props you can think of that I should be adding?
The Scribble Shop provided me with crafting supplies and compensation through a campaign with The Blueprint Social. All ideas, thoughts, and opinions about the products are mine. You can find ScribbleShop at their website, and follow them on facebook, twitter, and google plus.
![]()

Comments & Reviews
Oh My God! What?!? This is fabulous, probably my favorite in the challenge so far, just cuz it’s so dang creative!!
How super fun. You are 2 Cool for words!
The chalkboard shades are so fun!! 🙂 Great use of everything!!!
This is amazing. You knocked it out of the park my friend!!