I’m so excited to be guest posting over at My Four Monkeys today! Here is the project I created:
As a mom, I’m required to carry photos of my child around at all times. Some people really want to see the photos, others are just being polite. To carry around all the things I need on a daily basis, my purse already qualifies as a mid-sized suitcase… so I don’t want to lug around a ream of photos as well. That’s why today’s tutorial is this fun little pocket album!
You’ll need:
4 photos (cut to 2.5″x2.5″)
Chipboard
Mod Podge
20″ lengthe of 3/4″ Ribbon
Leftover scrap booking paper (four 5″x5″ pieces and four 3″x1″ pieces)
Craft knife, scissors
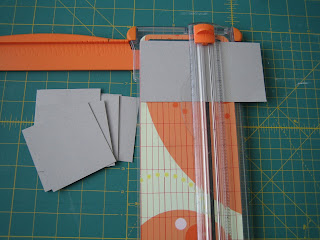
You can “upcycle” the chipboard that comes as package stabilizer when you buy a pack of scrapbook paper, and cut it into 3″ squares. You’ll get 9 squares out of your piece of chipboard, but you’re only using 8, so you can save the 9th for the next time you make this project!
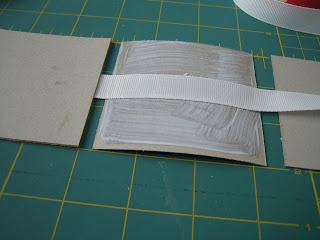
Lay out four of the pieces of chipboard, and brush the first with a coat of Mod Podge. Place the ribbon horizontally down the center, then add a little more Mod Podge, and “sandwich” another piece of chipboard on top. Repeat this process until all 8 pieces are used up, leaving 1/4″ gap between each “sandwich.”
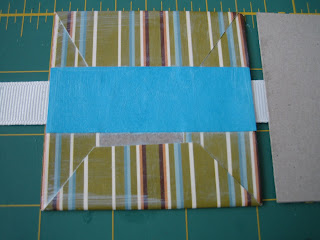
Next, put a coat of Mod Podge on the top of a chipboard “sandwich,” flip it over, and center it on the back of a piece of 5″x5″ scrap booking paper:
Using a craft knife, cut slits where the ribbon is “in the way.” Flip the piece back over, and fold in the slits so you can see where to trim them off.
Once they are trimmed off, flip the album back over, and trim the edges of the paper. 2 sides are trimmed square, and two sides get a 45-degree angle cut in (see the photo below for reference). Using more Mod Podge, fold in the squared sides first, then layer more Mod Podge…
… and fold in the angled sides. For good measure, give it another coat of Mod Podge. Top this with a 1″x3″ rectangle horizontally down the middle, which will cover the bare spots.
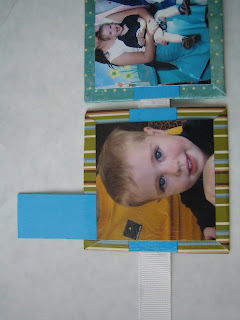
Give it all a good coat of Mod Podge, and then place a photo on top, smoothing it down. As much as you might think you want to, you don’t want to put Mod Podge over the glossy photos… if you do, they’ll stick to each other when you fold up the album. If you do get some Mod Podge on the photos, you can carefully peel it off after everything has dried. Repeat this process for the other three squares.
I added a “tag” to the top of the first page, which I flipped over to the front and wrote “Spring 2010” on before Mod-Podging it down.
After the fronts have dried, give the backs of the squares a good coat of Mod Podge to seal the paper. Let it all dry, and you’re done… you just need to find a pocket to put it in!
If you need more pockets in your life… check out Pocket Week over at Expect Moore… August 1-7th!


Comments & Reviews
Just a quick note to let you know that a link to this post will be placed on CraftCrave today [24 Jul 01:05pm GMT]. Thanks, Maria