• Skip to primary navigation
  • Skip to main content
  • Skip to primary sidebar
Home About Subscribe Summer Sew Camp Disclosures

Always Expect Moore

Quilts & Pattern Design

  • Cricut Maker BOTW
  • Quilty5k
  • Gallery Wall QAL
  • Trunk Show
  • Guild Resources
  • Pattern Shop
  • Free Patterns
Home About Subscribe Summer Sew Camp Disclosures
  • Cricut Maker BOTW
  • Quilty5k
  • Gallery Wall QAL
  • Trunk Show
  • Guild Resources
  • Pattern Shop
  • Free Patterns
Home » Blog » Uncategorized » Pocket Week – "Standard" Pockets

Pocket Week – "Standard" Pockets

Created On: August 7, 2010  |  Updated: August 7, 2010  |   Leave a comment

Today’s Pocket Week Sponsor is Plumebella. She has a wonderful Etsy shop chock-full of natural beauty products – lotions, soaps, skinwash, and lip balm.

She even sells her lipbalm in cute little containers, small enough to fit in the 5th Pocket of a pair of jeans! Great for us busy gals on the go! And, it keeps you from having that funky “chapstick bulge” in your pocket. Go check out her Etsy shop for all kinds of great items… you can also find her at her Facebook Page!

I’m giving away some of her 5th pocket balm tonight to one lucky follower… and then again tomorrow to someone who has linked to the Linky Party!

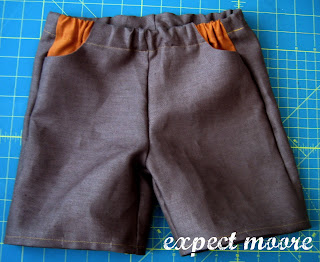
I didn’t put a 5th pocket on these shorts (though I suppose I could have), mostly because this was the pocket I was dreading. To cut the curves… and match them up… it was going to be a huge pain! Then, I thought up a “cheater method.”

I’m still not entirely happy with how these pants came out – I still wanted to share. These were much easier to make than I thought they would be, and I know exactly what changes I’ll make to have them come out “perfect” next time… I’ll share those changes with you here in the tutorial (so yours can come out perfect the first time)!

Cut out your pants pieces.
Cut out your rectangles to use for your pockets. I cut mine 5×14. I should have cut them 5×18 or 5×20 to make deeper pockets. You’ll want to cut yours at least as long as from the top of the pants to the bottom of the front crotch seam (multiply this length by 2). Cut 2 rectangles.
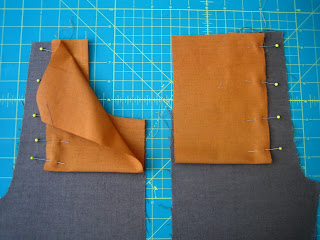
Place the rectangle pockets on top of your front pants pieces (make sure you have the front pieces).
Make your template. You will want to account for at least 2.5″ on the top that will become the casing. Even though 1″ of this casing will still show on the front, you don’t want to “count” it as part of the pocket. I did, which is why I have tiny little pockets. For the size rectangle I used for the pocket, my curve should go across 3″ and down 6.”
Cut your template, lay it on the fabric, and trace with a quilting pen.
Pin the fabrics together so they don’t wiggle while sewing. Make sure your fabrics are Right Sides Together.
Sew on the curve you drew. Then, cut off the excess fabric to 1/4″, and clip your curve.
Turn the pocket so the pocket is on the inside of your pants. Fold up the bottom half of the fabric, and pin the inside edge. Just pin through the pocket fabric, not the front of the pants.
Sew the pinned seam. Flip your pieces over, and pin everything together so it doesn’t slide around during the next steps. You may want to use safety pins if you’re worried about poking yourself.
Now start sewing your pants together. First, sew the front and back crotch seams. Then, sew your sides and your middle crotch seam.
Fold over the top 1/4″, then 1″, to make the casing for the elastic. Fold up the bottom of the pants 1/4″, then another 1/4″ to make the hem. Stitch down (leaving a hole in the casing seam to insert your elastic). Insert the elastic, stitch closed, and you’re done!
This may be the last day of Pocket Week… but we still have 2 more posts to go! Tomorrow is the big prize giveaway, so make sure that you’re a follower, and that you’ve uploaded your pocket project to the linky!

Expect Moore…soon!

posted in: Uncategorized

Previous
Pocket Week – Friday Winner!
Next
Pocket Week Guest Post – Creating a beautiful "Pocket" of space with Candace from Loft32

Reader Interactions

Leave A Reply! Cancel reply

Share your thoughts!
Your email address will not be published. Required fields are marked with *

This site uses Akismet to reduce spam. Learn how your comment data is processed.

Primary Sidebar

Hi, I'm Carolina!

I’m a Quilt Pattern Designer, Award Winning Quilter, and fan of all things quilting. I live in San Diego with my husband, our two boys and our pets. I love keeping both my hands and mind busy, so I’m always working on lots of projects. You’ll find lots of them shared here!

More About Me

Let's Keep In Touch!

I'll let you know about what's new in quilting, freebies you'll want to snag, and brighten your inbox about once a week!

subscribe
90% Faster Than Rotary Cutters

Fat Quarter Shop Quilting Fabrics and Supplies

Instagram Facebook Pinterest YouTube

Recent Posts

  • Flying Pig Quilt Block
  • Bunny and Carrot Quilt Block
  • Free Fancy Drink Quilt Block
  • Dutch Row Houses Quilt Block
  • Quilted Sports Jersey Numbers

Archives

Featured Projects

  • Everything you want to know about Pre Cut Fabrics!
  • Scrappy Placemat - easy to make scrap project
    Scrappy Placemat using Strips and Scrap Tape
  • Sewing Kaleidoscope SVG File
  • Drawstring Backpack
  • Carolina holding fabric marking pens
    Choosing Fabric Marking Pens

Let's Keep In Touch!

Brighten your inbox about once a week!

Always Expect Moore Submark Shop Patterns

Browse

  • Ruler of the Month
  • Quilty5k
  • QuiltMath
  • Cricut Maker BOTW

Shop

  • Digital Download Patterns
  • Quilting Notions
  • Quilt Stickers
  • Quilt Tees

Connect

  • YouTube
  • Instagram
  • Facebook Group
  • TikTok
©2025, Always Expect Moore. All Rights Reserved. About Disclosures
Back To Top
Design by Pixel Me Designs
×

Let's Keep In Touch!

I'll let you know about what's new in quilting, freebies you'll want to snag, and brighten your inbox about once a week!