• Skip to primary navigation
  • Skip to main content
  • Skip to primary sidebar
Home About Subscribe Summer Sew Camp Disclosures

Always Expect Moore

Quilts & Pattern Design

  • Cricut Maker BOTW
  • Quilty5k
  • Gallery Wall QAL
  • Trunk Show
  • Guild Resources
  • Pattern Shop
  • Free Patterns
Home About Subscribe Summer Sew Camp Disclosures
  • Cricut Maker BOTW
  • Quilty5k
  • Gallery Wall QAL
  • Trunk Show
  • Guild Resources
  • Pattern Shop
  • Free Patterns
Home » Blog » Uncategorized » Scrappy Rectangular Log Cabin Pillow

Scrappy Rectangular Log Cabin Pillow

Created On: May 4, 2012  |  Updated: May 4, 2012  |   Leave a comment

I loved the scrappy quilt I made, and wanted to make a big, comfy pillow for the couch on the opposite side of the room. I cut 2″ strips of the leftover fabric for the log cabin, and 4″ strips for the border.

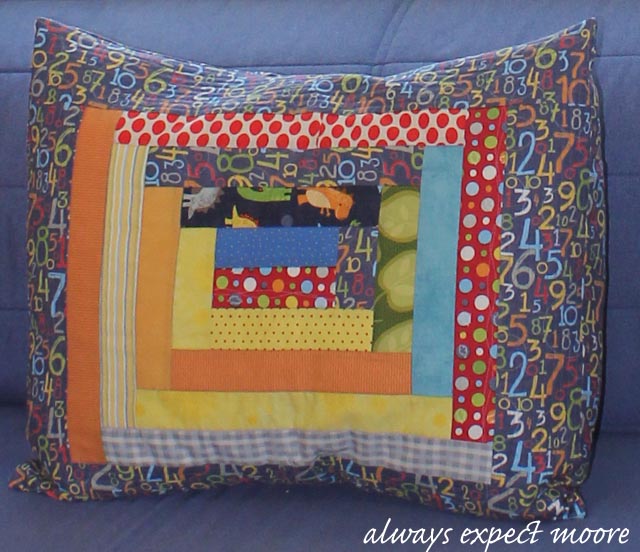
A traditional Log Cabin block is square. I wanted to use a standard-size pillow in mine, so I started with a rectangular strip in the middle, instead of the traditional square. Other Log Cabin traditions are to use red in the middle (this symbolizes the heart or hearth of the home), and to have light colors on one side, and dark on the other. I kept red in the middle, and somewhat kept to the light/dark theme, with lights on the left and bottom, and darker fabrics on the opposite sides.

After finishing the block, I framed it in the numbers fabric. I quilted the pillow top by making a “quilt sandwich” with inexpensive fabric on the back, and batting in the middle. I used inexpensive, plain fabric, because this will just be hidden inside the finished pillow, so no need to get fancy. The three layers were pinned together with a TON of safety pins. I quilted the pillow top using a “stitch in the ditch” on the log cabin, and concentric rectangles in the numbers fabric. I chose simple stitching so that I could stick with my walking foot. After the pillow top was quilted, I trimmed it to size and added the pillow back. Once I stuffed in a pillow, and was done!

Super simple, takes a little bit of time – but it can be done in an afternoon. And it is super comfy!

Always,

posted in: Uncategorized

Previous
My Big Messy Art Class at Kidville Las Vegas
Next
Dinosaur Nursery Decor Reveal!

Reader Interactions

Leave A Reply! Cancel reply

Share your thoughts!
Your email address will not be published. Required fields are marked with *

This site uses Akismet to reduce spam. Learn how your comment data is processed.

Primary Sidebar

Hi, I'm Carolina!

I’m a Quilt Pattern Designer, Award Winning Quilter, and fan of all things quilting. I live in San Diego with my husband, our two boys and our pets. I love keeping both my hands and mind busy, so I’m always working on lots of projects. You’ll find lots of them shared here!

More About Me

Let's Keep In Touch!

I'll let you know about what's new in quilting, freebies you'll want to snag, and brighten your inbox about once a week!

Thank you for subscribing!
subscribe
90% Faster Than Rotary Cutters

Fat Quarter Shop Quilting Fabrics and Supplies

Projects With Pre-Cuts - 7 Colorful Designs

Featured Projects

  • Everything you want to know about Pre Cut Fabrics!
  • Scrappy Placemat - easy to make scrap project
    Scrappy Placemat using Strips and Scrap Tape
  • Sewing Kaleidoscope SVG File
  • Drawstring Backpack
  • Carolina holding fabric marking pens
    Choosing Fabric Marking Pens

Let's Keep In Touch!

Brighten your inbox about once a week!

Always Expect Moore Submark Shop Patterns

Browse

  • Ruler of the Month
  • Quilty5k
  • QuiltMath
  • Cricut Maker BOTW

Shop

  • Digital Download Patterns
  • Quilting Notions
  • Quilt Stickers
  • Quilt Tees

Connect

  • YouTube
  • Instagram
  • Facebook Group
  • TikTok
©2023, Always Expect Moore. All Rights Reserved. About Disclosures
Back To Top
Design by Pixel Me Designs
×

Let's Keep In Touch!

I'll let you know about what's new in quilting, freebies you'll want to snag, and brighten your inbox about once a week!

Thank you for subscribing!