• Skip to primary navigation
  • Skip to main content
  • Skip to primary sidebar
Home About Subscribe Summer Sew Camp Disclosures

Always Expect Moore

Quilts & Pattern Design

  • Cricut Maker BOTW
  • Quilty5k
  • Gallery Wall QAL
  • Trunk Show
  • Guild Resources
  • Pattern Shop
  • Free Patterns
Home About Subscribe Summer Sew Camp Disclosures
  • Cricut Maker BOTW
  • Quilty5k
  • Gallery Wall QAL
  • Trunk Show
  • Guild Resources
  • Pattern Shop
  • Free Patterns
Home » Blog » Uncategorized » Christmas Ornaments From Empty Ribbon Spools

Christmas Ornaments From Empty Ribbon Spools

Created On: November 14, 2011  |  Updated: November 14, 2011  |   12 Comments

I love decorating for Christmas! Garland, holly, mistletoe… bright, shiny and sparkly… it is all so wonderfully festive! And I love covering my tree with handmade ornaments. Though there is nothing wrong with store-bought, I love the handmade ornaments that have been collected across the years (and the decades).

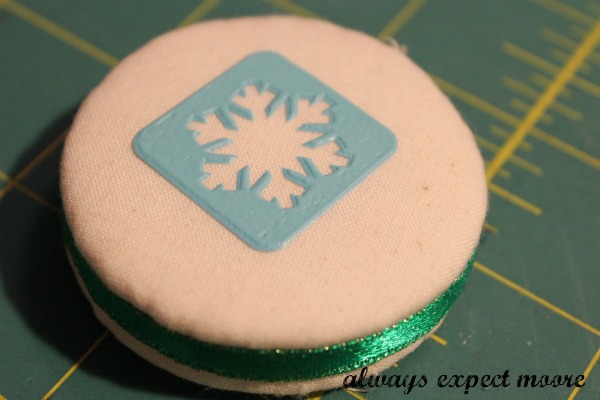
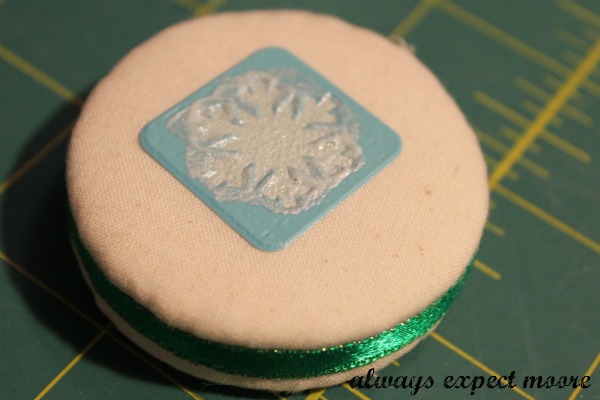
For several years, I’ve been saving empty ribbon spools… I was sure that the circle spool would be a great ornament base. The great folks at Plaid sent me a box of fantastic Martha Stewart Paints and stencils, and it was the inspiration I needed to turn the spools into fun and festive ornaments.

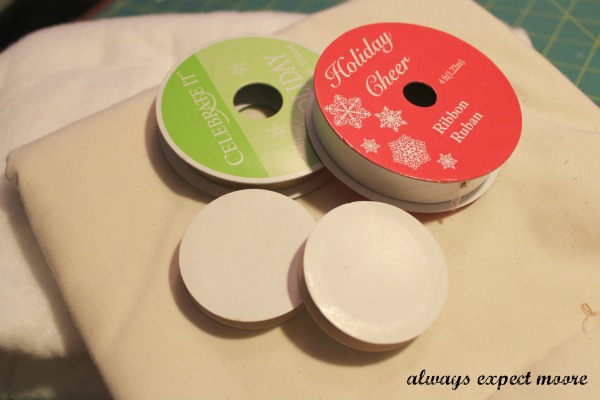
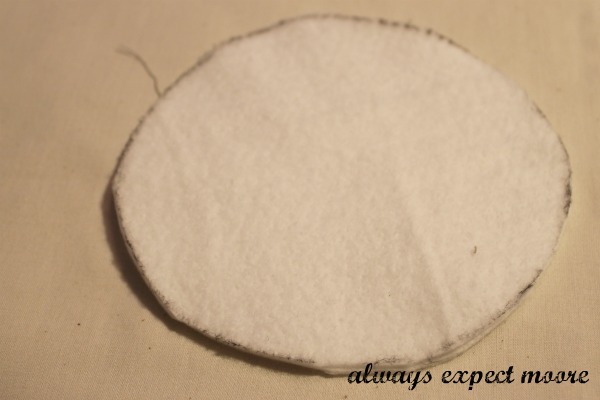
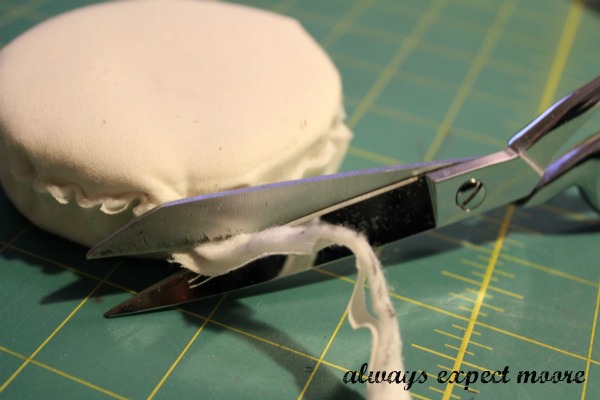
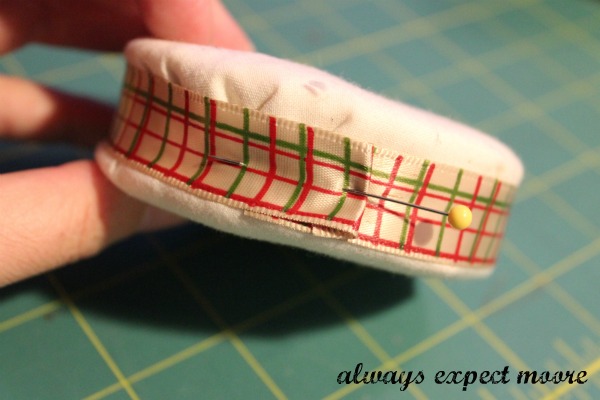
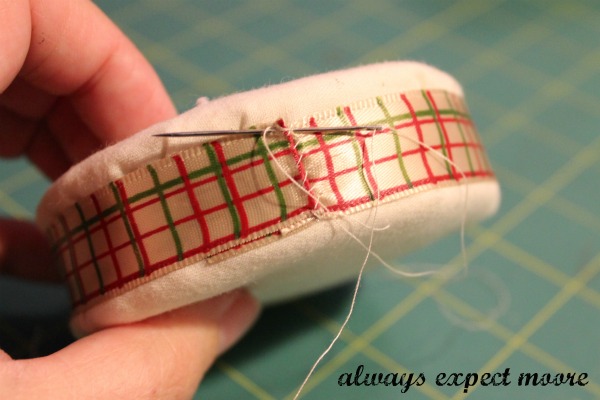
I started by gathering my supplies. Along with the Martha Stewart paints and stencils, I collected empty ribbon spools, scrap batting, fabric (I just used some unbleached muslin here, but you can use any fabric), and some ribbon to trim the edge. Other basic supplies are paint brushes, pins, and a needle and thread.

I traced the spools onto a double layer of scrap batting.

I cut out the circles, placed them back on the batting, and traced a larger circle free-hand. The goal is to have the difference between the small circle and large circle be just over half the size of the height of the spool.
I cut out this large circle (a double-layer of batting again), and then put it on a double layer of muslin, and cut the muslin the same size as the large circle.
I then stacked my layers. Spool on top, then the small batting circle, then the large batting circle, then the fabric. If you want a more puffy ornament, you can use more small circles of batting.
I repeated the layers on top of the spool, then pinned everything together along the sides.
I stitched the sides together, leaving the edge raw so that I can trim it after it has all been sewn. 
After stitching all the way around, I trimmed off the excess.
It doesn’t matter if the trimming is perfect, because it is all getting covered by some ribbon.
I stitched on the ribbon to hold it in place.
And tucked a small piece of ribbon through to hang the ornament.
The knot on the small ribbon gets tucked away under the big piece of ribbon.
Now for the fun part… decorating!! The sky is the limit here. All the Martha Stewart Crafts Paints work well on fabric… and there are lots of finishes including pearl, satin, glitter, and metallic. I’m not always confident in my ability to free-hand paint images, but with the stencils, I don’t have to worry – perfect every time!
The small stencils were great to work with, because they are already have adhesive on the back. I just needed to stick the stencil on, and paint.
 Because of the adhesive on the back, I didn’t need to worry about the paint slipping under the stencil.
For the larger stencils, Martha Stewart Crafts has great stencil adhesive. I just sprayed it on, and in a few minutes it was tacky and ready to use.
I used a stencil much larger than my ornament, and didn’t have to worry about it shifting while I painted. The stencil adhesive left no residue behind, and is re-positionable, so I can make several ornaments in a row.

I added some glitter finish on the small ornament for a little extra sparkle. On the large ornament, I tapped the white ribbon with some silver paint.

The Christmas tree is one of the Martha Stewart Crafts stencils, with lots of gold glitter in the background. I was able to free-hand the plaid to try to mimic the plaid on the ribbon.

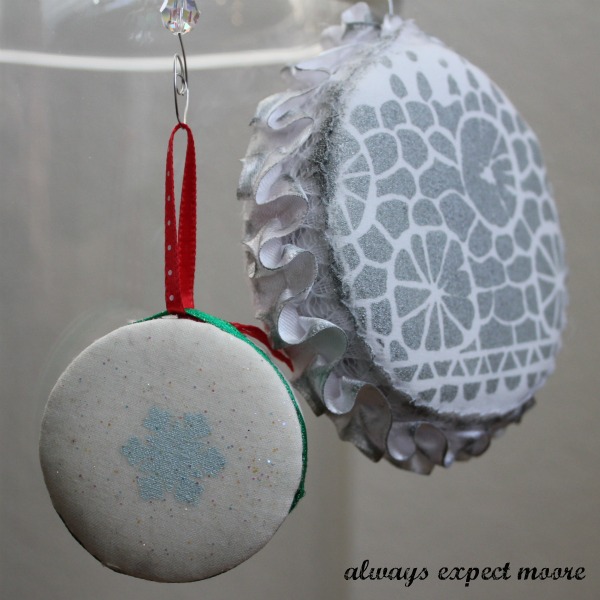
These were so much fun to put together – thanks Martha Stewart Crafts and Plaid for the inspiration… I can’t wait to decorate for Christmas!

Always,

disclosure: https://cmp.ly/3/NhKejJ

Linked up at:
Originate & Renovate – Handmade Holidays
Weekend Bloggy Reading

posted in: Uncategorized

Previous
Spider Web Frame
Next
Fun with Heelys Shoes

Reader Interactions

    Leave A Reply! Cancel reply

    Share your thoughts!
    Your email address will not be published. Required fields are marked with *

    This site uses Akismet to reduce spam. Learn how your comment data is processed.

    Comments & Reviews

  1. Condo Blues says

    November 14, 2011

    So cute and clever. And here I’ve been putting my empty cardboard spools in the recycling bin. Oops!

    Reply
  2. Marie Noelle says

    November 14, 2011

    I love the idea! Those ornaments are so cute!!

    Reply
  3. The Answer Is Chocolate says

    November 14, 2011

    These turned out so great! I always stare at my empty ribbon spools thinking surely there must be SOMETHING I can do with these and you are a genius!

    Reply
  4. Mod Podge Amy says

    November 15, 2011

    Very cute Carolina! How fun. Love the recycling 😀

    Reply
  5. Alex says

    November 15, 2011

    That is a great idea!Pinning 🙂

    Reply
  6. Ali Lowell says

    November 15, 2011

    Supercute idea! I’m envisioning one with a stag head silhouette. Love it!

    Reply
  7. Debra says

    November 15, 2011

    You never cease to amaze me with your constant throw of new ideas 🙂

    Reply
  8. Ms Bibi says

    November 15, 2011

    Cara, these are so pretty…I love them.

    Reply
  9. Lisa Taylor says

    November 15, 2011

    These are so cute and creative! (I’m thinking I probably have some empty spools somewhere myself….)

    Reply
  10. Vivienne @ the V Spot says

    November 15, 2011

    Pure genius. Period.

    Reply
  11. Alexis Grace of NorthOnHarper says

    November 16, 2011

    These are adorable— and I love how personal you can make them…

    Reply
  12. Annie @ Originate and Renovate says

    November 27, 2011

    very cute

    Reply

Primary Sidebar

Hi, I'm Carolina!

I’m a Quilt Pattern Designer, Award Winning Quilter, and fan of all things quilting. I live in San Diego with my husband, our two boys and our pets. I love keeping both my hands and mind busy, so I’m always working on lots of projects. You’ll find lots of them shared here!

More About Me

Let's Keep In Touch!

I'll let you know about what's new in quilting, freebies you'll want to snag, and brighten your inbox about once a week!

subscribe
90% Faster Than Rotary Cutters

Fat Quarter Shop Quilting Fabrics and Supplies

Instagram Facebook Pinterest YouTube

Recent Posts

  • Flying Pig Quilt Block
  • Bunny and Carrot Quilt Block
  • Free Fancy Drink Quilt Block
  • Dutch Row Houses Quilt Block
  • Quilted Sports Jersey Numbers

Archives

Featured Projects

  • Everything you want to know about Pre Cut Fabrics!
  • Scrappy Placemat - easy to make scrap project
    Scrappy Placemat using Strips and Scrap Tape
  • Sewing Kaleidoscope SVG File
  • Drawstring Backpack
  • Carolina holding fabric marking pens
    Choosing Fabric Marking Pens

Let's Keep In Touch!

Brighten your inbox about once a week!

Always Expect Moore Submark Shop Patterns

Browse

  • Ruler of the Month
  • Quilty5k
  • QuiltMath
  • Cricut Maker BOTW

Shop

  • Digital Download Patterns
  • Quilting Notions
  • Quilt Stickers
  • Quilt Tees

Connect

  • YouTube
  • Instagram
  • Facebook Group
  • TikTok
©2025, Always Expect Moore. All Rights Reserved. About Disclosures
Back To Top
Design by Pixel Me Designs
×

Let's Keep In Touch!

I'll let you know about what's new in quilting, freebies you'll want to snag, and brighten your inbox about once a week!