• Skip to primary navigation
  • Skip to main content
  • Skip to primary sidebar
Home About Subscribe Summer Sew Camp Disclosures

Always Expect Moore

Quilts & Pattern Design

  • Cricut Maker BOTW
  • Quilty5k
  • Gallery Wall QAL
  • Trunk Show
  • Guild Resources
  • Pattern Shop
  • Free Patterns
Home About Subscribe Summer Sew Camp Disclosures
  • Cricut Maker BOTW
  • Quilty5k
  • Gallery Wall QAL
  • Trunk Show
  • Guild Resources
  • Pattern Shop
  • Free Patterns
Home » Blog » Quilt » Cricut Maker Block of the Week Quilt: Week 11 – Adding Borders

Cricut Maker Block of the Week Quilt: Week 11 – Adding Borders

Created On: December 1, 2017  |  Updated: August 22, 2022  |   Leave a comment

Welcome to week 11 of the Cricut Maker Block of the Week! This week we’re going to finish the quilt top. Yup – we can add quilt borders with the Cricut Maker. We’re going to be adding the borders that we cut in Week 1: Intro. Adding the borders means that the quilt top is complete, but our quilt isn’t finished yet. Next week I’ll show you how to quilt your quilt top, and the next week I’ll show you the final step: Binding. I promised you 14 weeks of making this quilt. In week 1 I shared both the into and the first block because I knew you wouldn’t want to wait to start sewing. So in the final week, I’ll share a fun bonus project with you!

If you have just found this series, start by going to the Cricut Maker Block of the Week Reference Page. That has all the links and videos to get you started from the very beginning.

Adding Borders

You can follow the written steps below, or you can watch this video as I show you how to put on the borders:

Add quilt borders with the Cricut Maker

Start by laying out the borders. There are two long strips and two short strips.

lay out borders

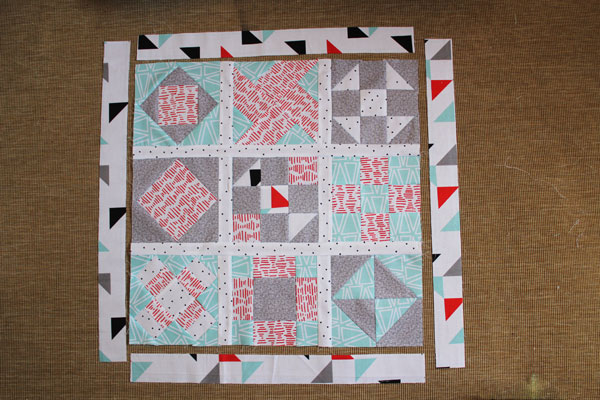
Stitch the short borders to the top and bottom of the quilt top. In the video I show you how to pin the strip to the quilt top to keep them even. Here are the basic steps:

Place the border piece on top of the quilt. Line up the top edge and corners. Pin at the corners.

Find the middle of the border and quilt edge. Add a crease if needed. Pin to secure the centers together.

Add more pins as needed on each side. Often, either the quilt is slightly bigger than the border, or the border is slightly bigger than the quilt. Pinning allows you to ease the extra fabric into the seam without ripples or puckers.

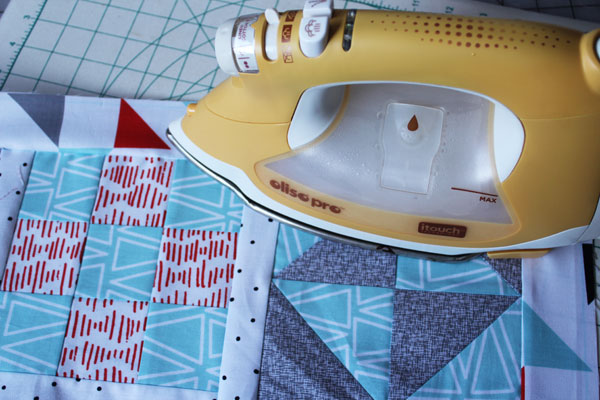
Press. The seam allowance should go towards the border.

press borders

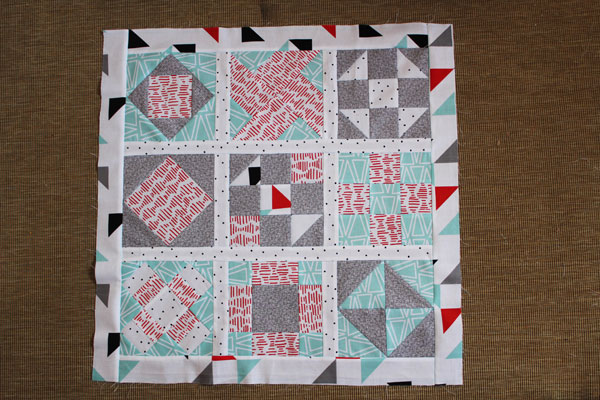
Now it is time to add the other borders.

add side borders

Follow the same steps to pin the borders to the quilt. Press again, and your quilt is complete!

finished quilt top

Come back next week as I show you how to quilt the quilt top!

posted in: Cricut Maker Block of the Week, Cricut Maker BOTW, Quilt, Quilt Pattern, Sewing Tutorials, Video

Previous
Cricut Maker Block of the Week Quilt: Week 10 – Adding Sashing
Next
Cricut Maker Block of the Week Quilt: Week 12 – Quilting the Mini Quilt

Reader Interactions

Leave A Reply! Cancel reply

Share your thoughts!
Your email address will not be published. Required fields are marked with *

This site uses Akismet to reduce spam. Learn how your comment data is processed.

Primary Sidebar

Hi, I'm Carolina!

I’m a Quilt Pattern Designer, Award Winning Quilter, and fan of all things quilting. I live in San Diego with my husband, our two boys and our pets. I love keeping both my hands and mind busy, so I’m always working on lots of projects. You’ll find lots of them shared here!

More About Me

Let's Keep In Touch!

I'll let you know about what's new in quilting, freebies you'll want to snag, and brighten your inbox about once a week!

subscribe
90% Faster Than Rotary Cutters

Fat Quarter Shop Quilting Fabrics and Supplies

Instagram Facebook Pinterest YouTube

Recent Posts

  • Flying Pig Quilt Block
  • Bunny and Carrot Quilt Block
  • Free Fancy Drink Quilt Block
  • Dutch Row Houses Quilt Block
  • Quilted Sports Jersey Numbers

Archives

Featured Projects

  • Everything you want to know about Pre Cut Fabrics!
  • Scrappy Placemat - easy to make scrap project
    Scrappy Placemat using Strips and Scrap Tape
  • Sewing Kaleidoscope SVG File
  • Drawstring Backpack
  • Carolina holding fabric marking pens
    Choosing Fabric Marking Pens

Let's Keep In Touch!

Brighten your inbox about once a week!

Always Expect Moore Submark Shop Patterns

Browse

  • Ruler of the Month
  • Quilty5k
  • QuiltMath
  • Cricut Maker BOTW

Shop

  • Digital Download Patterns
  • Quilting Notions
  • Quilt Stickers
  • Quilt Tees

Connect

  • YouTube
  • Instagram
  • Facebook Group
  • TikTok
©2025, Always Expect Moore. All Rights Reserved. About Disclosures
Back To Top
Design by Pixel Me Designs
×

Let's Keep In Touch!

I'll let you know about what's new in quilting, freebies you'll want to snag, and brighten your inbox about once a week!