• Skip to primary navigation
  • Skip to main content
  • Skip to primary sidebar
Home About Subscribe Summer Sew Camp Disclosures

Always Expect Moore

Quilts & Pattern Design

  • Cricut Maker BOTW
  • Quilty5k
  • Gallery Wall QAL
  • Trunk Show
  • Guild Resources
  • Pattern Shop
  • Free Patterns
Home About Subscribe Summer Sew Camp Disclosures
  • Cricut Maker BOTW
  • Quilty5k
  • Gallery Wall QAL
  • Trunk Show
  • Guild Resources
  • Pattern Shop
  • Free Patterns
Home » Blog » Uncategorized » Pocket Week – Pen Pockets

Pocket Week – Pen Pockets

Created On: August 6, 2010  |  Updated: August 6, 2010  |   2 Comments

The Ruby Rabbit has a fantastic Etsy shop, filled with all kinds of creative things. Several of them caught my eye, but one really caught my eye… a magnet made from a domino. She had glammed up this domino, and added the following saying, “Friends are like Pockets…you can never have too many!” Clearly, this magnet was made for me! Well, for me to be able to give to you, anyway… because The Ruby Rabbit is today’s sponsor!

She’s letting me give away two of these adorable magnets – one tonight to one of my followers! The other will be saved for the mega-prize-bonanza on Sunday, to someone who linked to the Pocket Linky, as we celebrate the end of Pocket Week!

This project is for pen pockets – I can never find a pen when I need one. Little Moore, however, can always find a pen when he wants to. Or a marker. Luckily, he writes on himself more often than he writes on the walls (easier cleanup).

To make finding pens easier when I’m out doing stuff – I made this zippered pouch that has elastic straps to fit over my binder. It would also work great for a sketch book, or small notebook (if the elastic straps were shorter. I added pen pockets on the front, so that I can always see if I’ve got a pen, and it makes the pen super handy. The zippered pocket can hold a cell phone, keys, a couple dollars, some gum… whatever else I need.

This project was inspired by Noodlehead’s Gathered Clutch (without the gathering) and this Binder Envelope over at Bolt Neighborhood, and I combined the two ideas and added a pen pocket (because you can never have too many pockets)!

Start by cutting out all of your pieces. 2 9×10″ pieces for the outside, 2 9×10″ pieces for the lining, and one 8×6″ piece for the pen pocket. Fold all pieces in half, making 4 9×5″ pieces, and one 6×4″ piece.

Sew around the 6×4″ pen pocket piece, leaving a hole for turning. Clip corners, turn, press flat.

Using a quilting pen, mark the lines for your pen pockets, 1 1/2 inches in on each side. Then pin the pocket to the front (still folded) piece, stitch around 3 sides (leaving the top open), and then down these 2 lines.

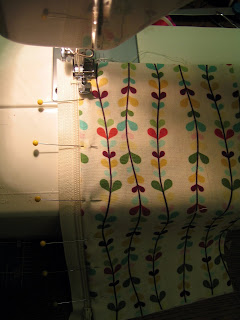
Pin the lining on the inside, and the front on the outside of the zipper (folded edge towards the zipper), then stitch on. Repeat with the other side. Using a zipper foot will make this much easier than using a regular foot.

Open the zipper. Put it in the middle, put both lining pieces towards one side, and both outside pieces on the other. this picture shows one outside piece lifted up, so you can see the zipper in the middle. Measure around your binder. Subtract 9″ for the pocket, and another inch or two for stretch (depending how stretchy your elastic is, and how big your binder/notebook is), and pin an end of each piece to opposite sides, tucking in all the elastic so it doesn’t get caught in the stitching.

Sew around all four sides, going slowly over the zipper ends, because there is a lot of fabric there. Leave a hole at the bottom of the lining pieces for turning. Turn everything right side out, sew up the hole, and you’re done! : )
Expect Moore… soon!

posted in: Uncategorized

Previous
Pocket Week Guest Post – Kitchen Karate
Next
Pocket Week Winner – Thursday Night Winner!

Reader Interactions

    Leave A Reply! Cancel reply

    Share your thoughts!
    Your email address will not be published. Required fields are marked with *

    This site uses Akismet to reduce spam. Learn how your comment data is processed.

    Comments & Reviews

  1. p.s.phyllis sews says

    August 6, 2010

    Really like this idea! I think this might be something that my college-aged daughter could use! Thanks for sharing this!

    Reply
  2. Anonymous says

    August 22, 2012

    Actually found the Binder Envelope at:

    http://www.boltneighborhood.com/blog/2010/6/27/envelope-it-a-tutorial.html

    Thanks for this!!

    Reply

Primary Sidebar

Hi, I'm Carolina!

I’m a Quilt Pattern Designer, Award Winning Quilter, and fan of all things quilting. I live in San Diego with my husband, our two boys and our pets. I love keeping both my hands and mind busy, so I’m always working on lots of projects. You’ll find lots of them shared here!

More About Me

Let's Keep In Touch!

I'll let you know about what's new in quilting, freebies you'll want to snag, and brighten your inbox about once a week!

Thank you for subscribing!
subscribe
90% Faster Than Rotary Cutters

Fat Quarter Shop Quilting Fabrics and Supplies

Projects With Pre-Cuts - 7 Colorful Designs

Featured Projects

  • Everything you want to know about Pre Cut Fabrics!
  • Scrappy Placemat - easy to make scrap project
    Scrappy Placemat using Strips and Scrap Tape
  • Sewing Kaleidoscope SVG File
  • Drawstring Backpack
  • Carolina holding fabric marking pens
    Choosing Fabric Marking Pens

Let's Keep In Touch!

Brighten your inbox about once a week!

Always Expect Moore Submark Shop Patterns

Browse

  • Ruler of the Month
  • Quilty5k
  • QuiltMath
  • Cricut Maker BOTW

Shop

  • Digital Download Patterns
  • Quilting Notions
  • Quilt Stickers
  • Quilt Tees

Connect

  • YouTube
  • Instagram
  • Facebook Group
  • TikTok
©2023, Always Expect Moore. All Rights Reserved. About Disclosures
Back To Top
Design by Pixel Me Designs
×

Let's Keep In Touch!

I'll let you know about what's new in quilting, freebies you'll want to snag, and brighten your inbox about once a week!

Thank you for subscribing!