I love having a little boy. I grew up with three brothers. I am not a big fan of the color pink. BUT that doesn’t mean that I don’t ooh and aah over all the adorable little girl clothes and crafts I see out there on the ‘net.
That’s where my beautiful little niece R comes in. I can make her all the cute, ruffled, pink outfits I want (getting them out of my system), so that I can work on Monsters and Trucks (or Monster Trucks) for my Little Moore.
I saw some really cute ruffle-butt onesie tutorials out in blog-land, and really liked Char from {Crap I’ve Made}‘s Tutorial over at U-Create. But… my serger is out of commission (the shop says they’ll work on it for $300.00, but no guarantee that they’ll be able to get it working properly). She has a couple good options for making ruffles without using a serger, but I decided to go a slightly different route… here’s what I did.
I took a fat quarter of pink fabric (so I could get all of the ruffles and the pink out of my system at the same time).
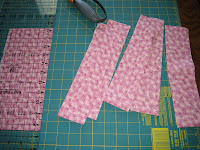
I cut 5 2.5″ strips. I sewed these strips with a 1/4″ seam allowance, then turned them right side out. I pressed them with the seam down the middle of the strip (not at one edge).
 Using the largest stitch setting, I sewed right down the middle (down the seam), and then pulled the thread to gather the strip into a long strip that is ruffled on both sides.
With water-soluble pen, I marked 5 lines on the onesie that were 1″ apart. This, coincidentally, was the width of my strips after being folded and sewn.
I pinned the ruffle strips down on the lines I marked, using lots of pins. I had to be careful not to pull on the ruffle strips, because doing so can “un-do” some of the ruffling.
At each end, I left plenty of extra ruffling to sew down on the last step. 
I also made sure, when pinning, that the strip had not twisted while getting ruffled up.
Lastly, I made sure that I was pinning each ruffle strip with the seam side down. I didn’t want to see any of those seams on my finished piece.
I sewed down each ruffle using a small zig-zag stitch. I probably could have used a straight stitch, but I thought the small zig-zag would work better.
About halfway through the ruffles, I was pretty un-impressed. I didn’t think it looked very good, and was ready to toss the project… but I figured I might as well see it through to see what happens. I’m glad I did.
After sewing down the ruffles, I trimmed each end about 1/4″ from the seam on the onesie (either the side seam or the leg-hole seam). I folded this 1/4″ under, and then zig-zag stitched the ends down, making sure not to leave any raw edges.
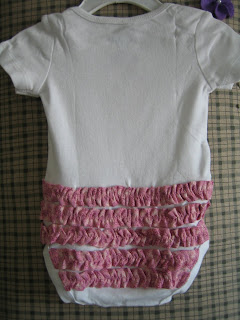
This part is also less than perfect… but… I think it is still pretty cute. And, a pretty simple way to take a onesie from ordinary to extra-special in about an hour or so.
Also, it was a great way to get both the pink and the ruffles out of my system… I’ve got fabric out to work on a couple more pj pants… cars and monkeys and stripes, oh my!
The finished butt looked like this:
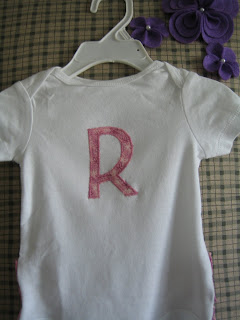
After making such a cute tush, I couldn’t leave the front un-adorned, now could I? So I used my Cricut-Fabric technique to applique an “R” on the front. I’m going to need to get another font cartridge for my Cricut…
Expect Moore… soon!
CM
p.s. I’m linking up this post to:


Comments & Reviews
those are cute! I will have to make one for my friend who just found out she is having a girl! 🙂