• Skip to primary navigation
  • Skip to main content
  • Skip to primary sidebar
Home About Subscribe Summer Sew Camp Disclosures

Always Expect Moore

Quilts & Pattern Design

  • Cricut Maker BOTW
  • Quilty5k
  • Gallery Wall QAL
  • Trunk Show
  • Guild Resources
  • Pattern Shop
  • Free Patterns
Home About Subscribe Summer Sew Camp Disclosures
  • Cricut Maker BOTW
  • Quilty5k
  • Gallery Wall QAL
  • Trunk Show
  • Guild Resources
  • Pattern Shop
  • Free Patterns
Home » Blog » Uncategorized » Sweetheart Candy Dangly Earrings

Sweetheart Candy Dangly Earrings

Created On: January 18, 2012  |  Updated: January 18, 2012  |   28 Comments

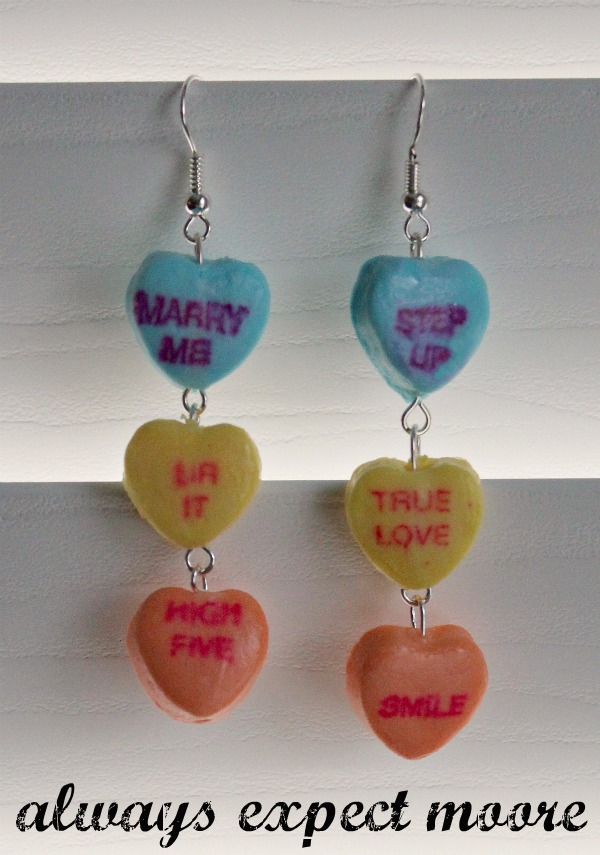
This is the perfect craft for anyone who DOESN’T have a sweetheart this Valentine’s Day. Just grab yourself a 50-cent box of Sweetheart candies, your favorite electric drill, and drill to the heart of the matter. In the process, you’re sure to break a heart or two… but you’ll have some sweet desserts when the project is complete!

Though the process for making these earrings is pretty straight-forward, the technique is not. Drilling a hole through the center of a hardened-sugar candy is not for the easily frustrated. I broke more candies than I successfully drilled. It took 2 boxes of candies for me to get enough color duplicates to make a set. It was an exercise in patience… but I think worth the time.

I started out with 2 boxes of Sweethearts Candy Hearts, a bottle of Mod Podge Hard Coat, and jewelry making supplies (round-nose pliers, clippers, earring hooks, 2 headpins, 4 eyepins), paintbrush, drill with a 1/16 drill bit, and lots of patience.

 The first step was to drill the candies. I put my electric drill on the table, so it would stand on its own. I put a candy between the thumb and forefinger of my left hand, held it firm and steady against the drill bit, and used my right hand to operate the drill. This might have been a little dangerous. Use any and all safety precautions when operating tools.
There were quite a few candies that were sacrificed in the making of these earrings. Some broke immediately, some chipped, and some snapped at the very end. To minimize breakage, start on one side, drill halfway, then stop. Reverse the drill direction, and remove carefully. Turn the candy over, and repeat for the other side. You’ll know you’ve broken through to the hole on the other side, because you will feel less resistance. Again, reverse the drill direction, and back the drill out.
After you’ve put holes through enough candies, it is time for the slightly-less-frustrating part. Adding the Mod Podge Hard Coat. This will add a seal to the candies, making them more resilient. Even so, I wouldn’t put these earrings on with wet hair… just in case.
When applying the Mod Podge to the top of the candies, add a quick, thin coat in one pass. If you go back over the wet Mod Podge, the ink on the candy will smear. Also, if the Mod Podge is too thick, it can cause the ink to smear or run. And runny ink is not cute.
I put on two coats, on the front, back, and sides. After each coat, I blew into the holes to keep them clear of any Mod Podge buildup, and let the candy dry before adding the second coat.
Once the candies had their second coat, and were mostly dry, it was time to add the hardware. I’m not a jewelry-making expert, but here are the parts I used.
I started with the bottom candy, threading the headpin through from the bottom. Using round-nosed pliers, I curved the top down. You want to be really careful here, because too much pressure could cause your candy to crack… which would be really frustrating this far into the project.
I clipped down the length of the headpin, added an eyepin, and then curled the headpin the rest of the way with the round-nosed pliers. I did the same with the next candy, and then the last candy, adding the earring wire at the top.
And here they are all finished and ready to wear!

Always,


Pin It

Linked up at:

posted in: Uncategorized

Previous
Valentine’s Day XOXO Tea Lights
Next
Valentine’s Day Tic-Tac-Toe in a Zippered Pouch

Reader Interactions

    Leave A Reply! Cancel reply

    Share your thoughts!
    Your email address will not be published. Required fields are marked with *

    This site uses Akismet to reduce spam. Learn how your comment data is processed.

    Comments & Reviews

  1. Alexis Grace says

    January 18, 2012

    Not really my style, but cute for a little girl!

    Reply
  2. Ms Bibi says

    January 18, 2012

    Very creative.I don’t wear long earring (unless my kids make them then I am obligated by moms code,lol),but I know lots of ladies and girls that would proudly sport these on Valentine’s Day.

    Reply
  3. Holly says

    January 18, 2012

    These are really cute, especially as Alexis said, for a little girl.

    Reply
  4. samsstuff says

    January 18, 2012

    Very cute! This would make a great little Valentine gift for girls or young teens 🙂 Thanks for the tutorial

    Reply
  5. Jamie says

    January 18, 2012

    Those would be great for a little girl. Love the creativity

    Reply
  6. SharleneT says

    January 19, 2012

    You do realize that, if you did not put the Mod Podge over the candies, you could wear them and actually end up with someone to give a Valentine’s gift to, next year! This falls under the category of using pizza sauce for your perfume. What a great idea this was in I believe you when you say that it takes patience and persistence. Well done. Come visit when you can.

    Reply
  7. Katie says

    January 19, 2012

    OMG! great minds think a like! I just mod podged some sweetheart candies for a future jewelry project! I love how your earrings turned out!

    Reply
  8. Alex says

    January 20, 2012

    Oh very cute!!

    Reply
  9. Wendys Hat says

    January 20, 2012

    Darling darling darling! Love this! Sending love from Vegas Bloggers!

    Reply
  10. Frugal Ferret says

    January 20, 2012

    Wow Carolina!

    Sweetheart Earrings — would have never thought of that one.

    Make an edible Sweethart necklace to go with it. 🙂

    Reply
  11. Las Vegas Mama says

    January 21, 2012

    What an adorable craft!! Very cool! I am not on Pinterest but if I were, I would totally pin it!

    Reply
  12. Brandie @ Home Cooking Memories says

    January 21, 2012

    So clever!! Pinned this for sure!

    Reply
  13. Amy Anderson says

    January 22, 2012

    Brilliant Carolina! These are so fun. I would try to eat them off someone’s ears.

    Reply
  14. One of The Wildwomen says

    January 25, 2012

    I might suggest using a pair of pliers with a piece of fabric to hold the heart while drilling..I’ve learned a lot by mistakes…my husband won’t watch when I use power tools….what we do for crafting!! lol

    Reply
  15. Dawn Grobe says

    January 28, 2012

    What a cute idea. I’ll bet Ms Bibi could make these with just one heart or as post earrings.

    Reply
  16. Atticelf says

    January 29, 2012

    LOL…how fun! I have to make these for my daughter. And me. 🙂

    Reply
  17. Anonymous says

    February 7, 2012

    Great post! I had bookmarked it for reference and just made some pairs tonight to give as teacher gifts. A couple of pointers for those who are nervous about the drilling – I used a small plastic clamp from the hardware store to hold my candy, then held the clamp in one hand and the drill in the other. Much safer and no chance of injury that way. Also, I had bought a bunch of brands of hearts – including a box of Spanish ones – and I noticed that the Brachs brand hearts are much thicker than the original Necco ones. So go for those if you are worried about breakage – with the thicker ones I did not have any hearts break, with the thinner Necco ones I had similar sacrifices as Carolina.

    Reply
  18. THE SHANZ says

    January 21, 2013

    Great tutorial. Although, if one had access to a vice – I’d put cloth on the jaws, and then drill, slowly allowing the drill to naturally pull down, not forcing it down. Thanks for the very creative idea – I know two young girls who will LOVE these as gifts in the very near future.

    Reply
  19. Jaclyn N Lil M says

    January 21, 2013

    very cute 🙂 love it!!

    Reply
  20. Anonymous says

    January 27, 2013

    Question, I saw this yesterday and I don’t know wouldn’t clear nail polish work also

    Reply
    • Carolina says

      January 28, 2013

      Clear Nail Polish might work – you just have to test with what you have on hand. I haven’t tried it, but I can’t think of any reason that it would not. You still would have to be very careful when you put the nail polish over the writing, so that it doesn’t smudge.

      Reply
  21. Bittersweetcupcake says

    January 3, 2014

    It would’ve been a million times easier if you’d just dip them in Ice Resin and then drill a hole in them. Takes 2 minutes and I assure you, none would break once coated in resin. The drilling would’ve been a piece of cake! AND, they’d last forever, literally! Wet hair, dry hair, you could even swim wearing those earrings! 🙂
    Try it next time 🙂

    Reply
  22. Diane says

    January 13, 2014

    Love this idea, and thanks for the warning about breakage. I want to give it a try.

    Reply

Primary Sidebar

Hi, I'm Carolina!

I’m a Quilt Pattern Designer, Award Winning Quilter, and fan of all things quilting. I live in San Diego with my husband, our two boys and our pets. I love keeping both my hands and mind busy, so I’m always working on lots of projects. You’ll find lots of them shared here!

More About Me

Let's Keep In Touch!

I'll let you know about what's new in quilting, freebies you'll want to snag, and brighten your inbox about once a week!

Thank you for subscribing!
subscribe
90% Faster Than Rotary Cutters

Fat Quarter Shop Quilting Fabrics and Supplies

Projects With Pre-Cuts - 7 Colorful Designs

Featured Projects

  • Everything you want to know about Pre Cut Fabrics!
  • Scrappy Placemat - easy to make scrap project
    Scrappy Placemat using Strips and Scrap Tape
  • Sewing Kaleidoscope SVG File
  • Drawstring Backpack
  • Carolina holding fabric marking pens
    Choosing Fabric Marking Pens

Let's Keep In Touch!

Brighten your inbox about once a week!

Always Expect Moore Submark Shop Patterns

Browse

  • Ruler of the Month
  • Quilty5k
  • QuiltMath
  • Cricut Maker BOTW

Shop

  • Digital Download Patterns
  • Quilting Notions
  • Quilt Stickers
  • Quilt Tees

Connect

  • YouTube
  • Instagram
  • Facebook Group
  • TikTok
©2023, Always Expect Moore. All Rights Reserved. About Disclosures
Back To Top
Design by Pixel Me Designs
×

Let's Keep In Touch!

I'll let you know about what's new in quilting, freebies you'll want to snag, and brighten your inbox about once a week!

Thank you for subscribing!