• Skip to primary navigation
  • Skip to main content
  • Skip to primary sidebar
Home About Subscribe Summer Sew Camp Disclosures

Always Expect Moore

Quilts & Pattern Design

  • Cricut Maker BOTW
  • Quilty5k
  • Gallery Wall QAL
  • Trunk Show
  • Guild Resources
  • Pattern Shop
  • Free Patterns
Home About Subscribe Summer Sew Camp Disclosures
  • Cricut Maker BOTW
  • Quilty5k
  • Gallery Wall QAL
  • Trunk Show
  • Guild Resources
  • Pattern Shop
  • Free Patterns
Home » Blog » Uncategorized » Yo Yo Bangle Bracelet

Yo Yo Bangle Bracelet

Created On: July 13, 2011  |  Updated: July 13, 2011  |   28 Comments

A couple weeks ago, Arrow Cabinets sent a call out on their blog for contest entries in their Yo-yo contest.

You might ask, what is a yo-yo? Essentially, it is a little gathered fabric circle. In the past, I’ve had absolutely no use for yo-yos. I’ve always thought they were very “granny” looking. Since I won the last Arrow contest with my cactus pincushion, I thought I would give it another go… with the true challenge being finding a way to make yo-yos look cute.

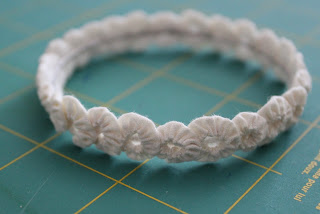
Each bracelet uses about 25 mini yo-yos, and took a couple hours to make. They require some tiny stitches and nimble fingers, but there is nothing especially tricky about making them.

If you want to make your own, here is a step-by-step tutorial that shows you how…

Supplies:
Scrap fabric
Fabric marking pen
Quarter
Needle & thread
Bangle bracelet
Scrap of felt
Gorilla Glue

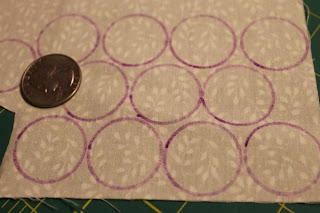
I started out by tracing my quarter on the fabric. I used a fabric marking pen that disappears over time.
I then cut out the circles, just outside the marker line. You can see the ink is already starting to fade.
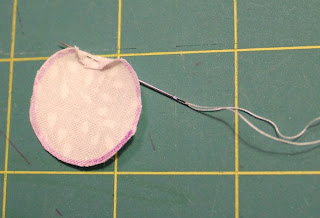
I grabbed my needle and thread and started stitching. Using small stitches, I folded in the edge, and did a simple “up and down” through the layers with my needle.
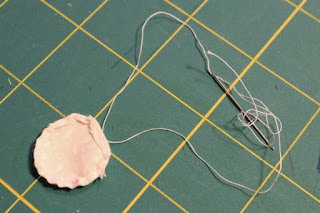
This is what it looked like after I stitched all the way around.
I carefully pulled the thread tight. Carefully, because pulling too hard might cause the thread to snap. I then tied a double knot, and cut the threads close to the knot.
Using the hole as the top center, I squished the little fabric ball between my fingers to make it flat. This is what a completed mini yo-yo looks like:
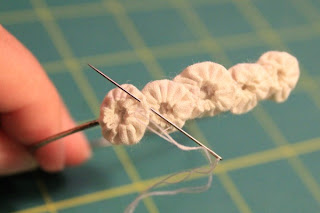
Using coordinating thread and tiny stitches, I started attaching the yo yos to the bangle.
I used stitches on the back, as well as tiny stitches on the front so the yo-yos would lay flat.
Here is the bracelet with all the yo-yo attached.
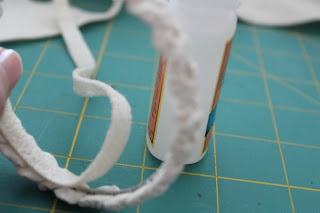
Then it was time to attach the craft felt. I used a strip in a coordinating color a 1/4″ wide.
I glued the felt to the inside of the band with Gorilla Glue. This not only hides the bangle and the stitches on the back, but when the glue dries it supplies additional support, and makes sure that the yo-yos don’t twist around the bangle.
The hardest part was waiting to let it dry…

Finished… now time to make some more!

Click here to see all the Yo-yo Contest entries.

Always,

Pin It

Linked in Blogland at:
Todays Creative Blog Weekend Bloggy Reading

posted in: Uncategorized

Previous
HGTV’s Design Star Season 6 Starts Tonight!
Next
Think You’ve Seen Enough? HGTV Design Star Tonight!

Reader Interactions

    Leave A Reply! Cancel reply

    Share your thoughts!
    Your email address will not be published. Required fields are marked with *

    This site uses Akismet to reduce spam. Learn how your comment data is processed.

    Comments & Reviews

  1. Trianna says

    July 13, 2011

    These are really cute! I will admit when you said yo-yo…I was thinking of the toy! How long did it take you to make these?

    Reply
    • Butzen says

      January 24, 2013

      Yes, so that I can make it also! Because it really looks OK!

      Reply
  2. Webly says

    July 13, 2011

    When I was a teenager I used to do head bands for my ponytails using the same technique. That’s a great activity I can do with my niece. She loves crafts.

    Reply
  3. sandandstarfish says

    July 13, 2011

    This is so cute!

    Reply
  4. Marie Noelle says

    July 13, 2011

    Wow, it’s a really cute bracelet!!! I will try this!

    Reply
  5. Carla Royal says

    July 13, 2011

    Oh, how cute! You always make these things look so simple. I am impressed.

    Reply
  6. Kim @CoffeePotChronicles.com says

    July 13, 2011

    These are so cute! Unfortunately I don’t have nimble fingers and can’t sew worth a darn so I’d have to perhaps e-mail a certain blogger and see if she’d be willing to make one for me. *ahem* Heehee.

    Reply
  7. Alexis of NorthOnHarper says

    July 13, 2011

    Aww these are adorable!!!! These are so well done!!!

    Reply
  8. Alex says

    July 14, 2011

    Very cute!!! You should submit to One Pretty Thing

    Reply
  9. jan says

    July 14, 2011

    Very cute!

    Reply
  10. Ms Bibi says

    July 14, 2011

    Those are so pretty, but I would get frustrated after trying to make the first tiny yo-yo. I am so not crafty like that at all and I am totally jealous of crafty people like you.

    Reply
  11. Evelene S says

    July 14, 2011

    You made the yo yo look modern by putting it on the bracelet. Great job!

    Reply
  12. Lisa says

    July 14, 2011

    These are too cute! Fun idea.

    Reply
  13. Nancy StylenDecorDeals says

    July 17, 2011

    You make it look so easy! You are so talented! Love it!

    I’m a new follower from the blog hop!
    Hope you’ll hop by and visit my blog too!
    Have a great Sunday!
    nancy
    http://stylendecordeals.blogspot.com/

    Reply
  14. Heather - Dollarstorecrafts.com says

    July 17, 2011

    Oh my gosh!!! The patience you must have to have made all these. Wow. I’m in awe!

    Reply
  15. Amanda @ Serenity Now says

    July 18, 2011

    Very late to the game here, but had to tell you what a cute idea this is!! So feminine without being all grandma-doilie-ish. Love it! Thanks for linking up. 🙂

    Reply
  16. SouthernScraps says

    July 19, 2011

    These are adorable. Another cute use for the yo-yo. I used to think they were rather “Grannyish” too.

    Reply
  17. snickerdoodleloves says

    July 28, 2011

    Umm, this is pretty much the coolest DIY I’ve found in some time. Thank you for adding another project to my list 🙂

    Reply
  18. Jenna, SAS Interiors says

    August 21, 2011

    SO creative and adorable! Great project. I just came across your site through Stumble Upon and now you’ve gotten a new follower. So glad to have found you!

    ~Jenna
    http://www.sasinteriors.net

    Reply
  19. Throckmorton Jones says

    August 22, 2011

    This is adorable! I want to add this to my to-make list, but not sure I would ever actually do it… lol. Too small and fiddly, and too much hand sewing for me. I’m spoiled by my machine I guess.

    Reply
  20. danamom says

    September 2, 2011

    totally cute

    Reply
  21. Launi says

    September 23, 2011

    Really pretty! Do you have any trouble with it twisting when you wear it? I love it!

    Reply
  22. Libby & Lee Accessories says

    January 23, 2012

    LOVE THIS!!! My Nana and I used to spend HOURS making Yo-Yo’s, might have to make us both one of these!!

    Reply
  23. Anonymous says

    May 21, 2012

    So that’s what a hand crafted yo yo looks like. It’s good actually, but I guess giving it some colors will make it more beautiful.
    silver bullion uk

    Reply
  24. Brandie @ Home Cooking Memories says

    June 11, 2012

    This is so cute! Yo-Yo’s look pretty easy to make…bet I could do it!

    Reply
  25. ziggee says

    March 4, 2013

    I bet you could do the same thing using ribbon or elastic instead of a bangle.

    Reply

Primary Sidebar

Hi, I'm Carolina!

I’m a Quilt Pattern Designer, Award Winning Quilter, and fan of all things quilting. I live in San Diego with my husband, our two boys and our pets. I love keeping both my hands and mind busy, so I’m always working on lots of projects. You’ll find lots of them shared here!

More About Me

Let's Keep In Touch!

I'll let you know about what's new in quilting, freebies you'll want to snag, and brighten your inbox about once a week!

Thank you for subscribing!
subscribe
90% Faster Than Rotary Cutters

Fat Quarter Shop Quilting Fabrics and Supplies

Projects With Pre-Cuts - 7 Colorful Designs

Featured Projects

  • Everything you want to know about Pre Cut Fabrics!
  • Scrappy Placemat - easy to make scrap project
    Scrappy Placemat using Strips and Scrap Tape
  • Sewing Kaleidoscope SVG File
  • Drawstring Backpack
  • Carolina holding fabric marking pens
    Choosing Fabric Marking Pens

Let's Keep In Touch!

Brighten your inbox about once a week!

Always Expect Moore Submark Shop Patterns

Browse

  • Ruler of the Month
  • Quilty5k
  • QuiltMath
  • Cricut Maker BOTW

Shop

  • Digital Download Patterns
  • Quilting Notions
  • Quilt Stickers
  • Quilt Tees

Connect

  • YouTube
  • Instagram
  • Facebook Group
  • TikTok
©2023, Always Expect Moore. All Rights Reserved. About Disclosures
Back To Top
Design by Pixel Me Designs
×

Let's Keep In Touch!

I'll let you know about what's new in quilting, freebies you'll want to snag, and brighten your inbox about once a week!

Thank you for subscribing!