• Skip to primary navigation
  • Skip to main content
  • Skip to primary sidebar
Home About Subscribe Summer Sew Camp Disclosures

Always Expect Moore

Quilts & Pattern Design

  • Cricut Maker BOTW
  • Quilty5k
  • Gallery Wall QAL
  • Trunk Show
  • Guild Resources
  • Pattern Shop
  • Free Patterns
Home About Subscribe Summer Sew Camp Disclosures
  • Cricut Maker BOTW
  • Quilty5k
  • Gallery Wall QAL
  • Trunk Show
  • Guild Resources
  • Pattern Shop
  • Free Patterns
Home » Blog » Uncategorized » Make a Pineapple Photo Lampshade

Make a Pineapple Photo Lampshade

Created On: January 16, 2013  |  Updated: January 16, 2013  |   3 Comments

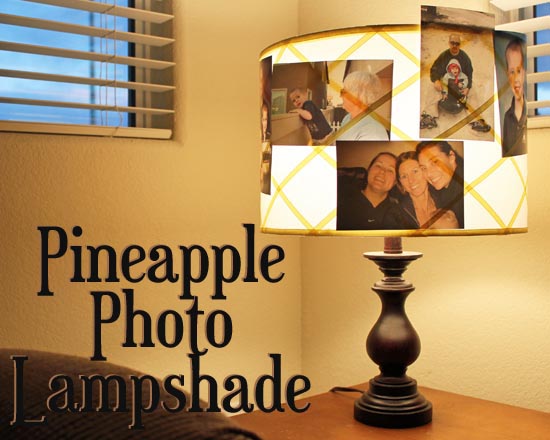
I was given this lampshade by Lamps.com, and challenged to do something fun with it. I had a blast! Read the end of this post to learn how you can see the other challenge entries, vote for me, and possibly win yourself a $100 gift card to Lamps.com!

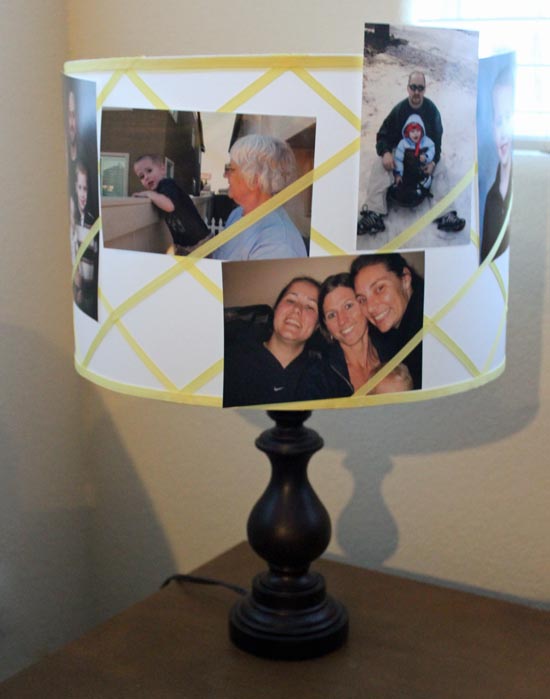
I take tons of photos, and print them out regularly. With the hope of scrapbooking them one day. I don’t want my photos to have to wait until I can journal about them or put them in a frame, I want to enjoy them right away! I took this great lampshade from Lamps.com and used the idea of the criss-cross ribbons on a french memo board to make a lampshade that reminds me of a pineapple – but is a great place to tuck photos (or birthday cards, or Christmas cards, or whatever the season brings!)

Supplies:
Lampshade
Ribbon (I used yellow grosgrain ribbon)
Glue gun
Needle and Thread (optional)
Bulb and Lamp Base

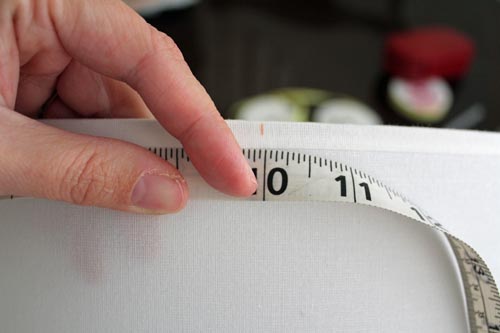
I started by measuring my lampshade, and then making a small mark every 10 inches along the edge. I did the same along the other edge, but off-centered my marks. So, on one side my marks were at 10, 20, 30 inches, and on the other side at 5, 15, 25 etc.

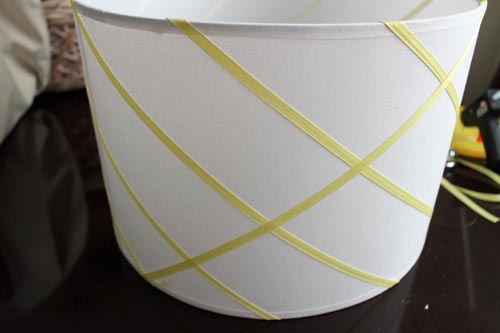
I glued ribbon from a mark on one side at an angle to a notch two down on the other side. I repeated this all the way around the lampshade.

I then repeated the process in the opposite direction.

 
On both the top and the bottom, I measured the criss-cross to keep them even, and stitched them in place with a few stitches. If you’re not the needle-and-thread type, you could use a glue gun.

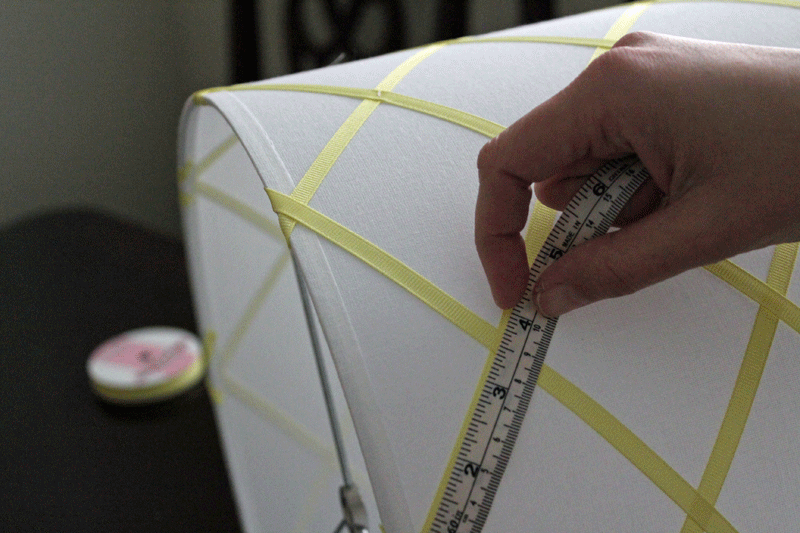
After I had stitched in place all the top and bottom crossings (leaving the center ones alone), I glued some ribbon around the top and the bottom of the lampshade to give it a finished look. Then I put the lampshade on my lamp base, and was able to tuck in my photos!

You can win a $100 Lamps.com gift card, and vote for your favorite lampshade transformation by visiting the Lamps.com site. I’d love it if you voted for me!

Disclosure: I was given free product from Lamps.com as compensation for this post.

posted in: Uncategorized

Previous
Pampering Myself for the New Year
Next
Christmas – All Wrapped Up

Reader Interactions

    Leave A Reply! Cancel reply

    Share your thoughts!
    Your email address will not be published. Required fields are marked with *

    This site uses Akismet to reduce spam. Learn how your comment data is processed.

    Comments & Reviews

  1. Jaclyn N Lil M says

    January 17, 2013

    Voted for you 🙂 Love your creative idea 🙂 and how you change the pictures or use christmas or birthday cards 🙂
    xoxo miss you

    Reply
  2. Nona Taylor says

    January 18, 2013

    I too voted for yours. I live in teacher house in rural Alaska. My picture frames didn’t make the trip here (broken glass) and I was trying to figure out how to hang my family pictures without simple stapling them to the walls. I have a shade that I can your design with. Great idea!

    Reply
  3. Gina H says

    January 18, 2013

    I love the animation you have going on!! What a great idea!

    Reply

Primary Sidebar

Hi, I'm Carolina!

I’m a Quilt Pattern Designer, Award Winning Quilter, and fan of all things quilting. I live in San Diego with my husband, our two boys and our pets. I love keeping both my hands and mind busy, so I’m always working on lots of projects. You’ll find lots of them shared here!

More About Me

Let's Keep In Touch!

I'll let you know about what's new in quilting, freebies you'll want to snag, and brighten your inbox about once a week!

Thank you for subscribing!
subscribe
90% Faster Than Rotary Cutters

Fat Quarter Shop Quilting Fabrics and Supplies

Projects With Pre-Cuts - 7 Colorful Designs

Featured Projects

  • Everything you want to know about Pre Cut Fabrics!
  • Scrappy Placemat - easy to make scrap project
    Scrappy Placemat using Strips and Scrap Tape
  • Sewing Kaleidoscope SVG File
  • Drawstring Backpack
  • Carolina holding fabric marking pens
    Choosing Fabric Marking Pens

Let's Keep In Touch!

Brighten your inbox about once a week!

Always Expect Moore Submark Shop Patterns

Browse

  • Ruler of the Month
  • Quilty5k
  • QuiltMath
  • Cricut Maker BOTW

Shop

  • Digital Download Patterns
  • Quilting Notions
  • Quilt Stickers
  • Quilt Tees

Connect

  • YouTube
  • Instagram
  • Facebook Group
  • TikTok
©2023, Always Expect Moore. All Rights Reserved. About Disclosures
Back To Top
Design by Pixel Me Designs
×

Let's Keep In Touch!

I'll let you know about what's new in quilting, freebies you'll want to snag, and brighten your inbox about once a week!

Thank you for subscribing!